You are here: Home / Tutorials / Step by step / Administrative instructions / Import addresses

Step by step
Import addresses
For an address import (CSV import) from other software programs, you need an Excel file or a so-called “CSV file”. If your previous software product does not offer the option of outputting such a file with address data, please contact the previous software provider. As a rule, they will provide you with this file for a “small” flat-rate fee.
Please note that a maximum of 5000 data records can be imported.
The file usually has to be adapted to the onOffice format. This is best done in Excel. You can also open and edit the “CSV file” in Excel or similar. At the end, the file required for the import is generated from Excel, see step 3. The import of search criteria is very complex and requires a “case-by-case solution”. If you are interested, please call our technical support on 0241/44686122.
Customizing the import file
As an example, you can download a file here which shows you how the Excel table should look at the end. You can also use this file to test the changes.
Please make a backup copy of the file with the addresses before editing. Just in case.
First, please delete all columns that you do not need in onOffice as well as empty columns if they exist.
In the next step, various entries must be adjusted, as some designations are different in the programs. The value can only be imported if the correct designation is entered.
This does not apply to text entries such as street or city. Changes are required to “Properties” which are selected from a list of different values. A good example is the salutation; the list of possible entries looks different in every program.
It is not necessary to adapt the column header to the usual spelling in onOffice!
Here are some changes that usually have to be made:
| Column | Old entry | Entry for onOffice |
| Salutation | Mr | Mr |
| Country | DEU | Germany |
| Country | ESP | Spain |
| Type of contact | Prospective buyer | Interested party Purchase |
| Project notes | – | – |
This raises the question: What name is used in onOffice? You can view this under Extras >> Settings >> Administration .
Depending on whether only one selection is possible for the property (e.g. title or country) or whether several entries are permitted, we speak of single-select fields (one selection) or multi-select fields (several selections).
There is a separate tab in the administration for both cases. If you are not sure whether single or multi-select, open an address data record in onOffice and take a look at the field. The edit symbol can be seen next to the multi-select fields.
As an example of a multiselect field, we will take the contact type field and explain where and how you can find the correct designations.
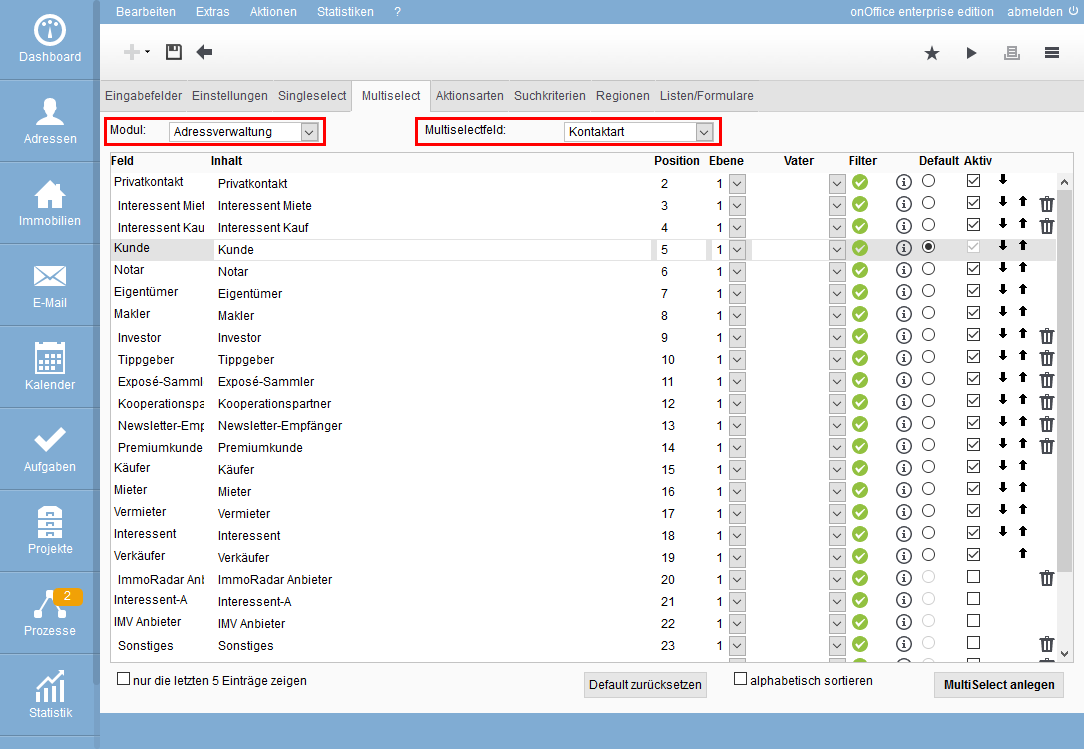
- After you have opened Extras >> Settings >> Administration , go to the “Multiselect” tab. You can find more information here.
- Select the “Address management” module and
- as multiselect field “Contact type”
A list of all existing contact types is displayed. You will find the active entries at the top of the list. If you require further entries, you can activate them by ticking the “Active” column.
Please correct the entries for the Contact type column so that it corresponds to the spelling (incl. upper/lower case) in onOffice. The best way to do this is with the Excel function “Search and replace”.
For the example “prospective buyer”, you would have to enter “prospective buyer purchase” everywhere. Please repeat this with all other designations in the contact type column.
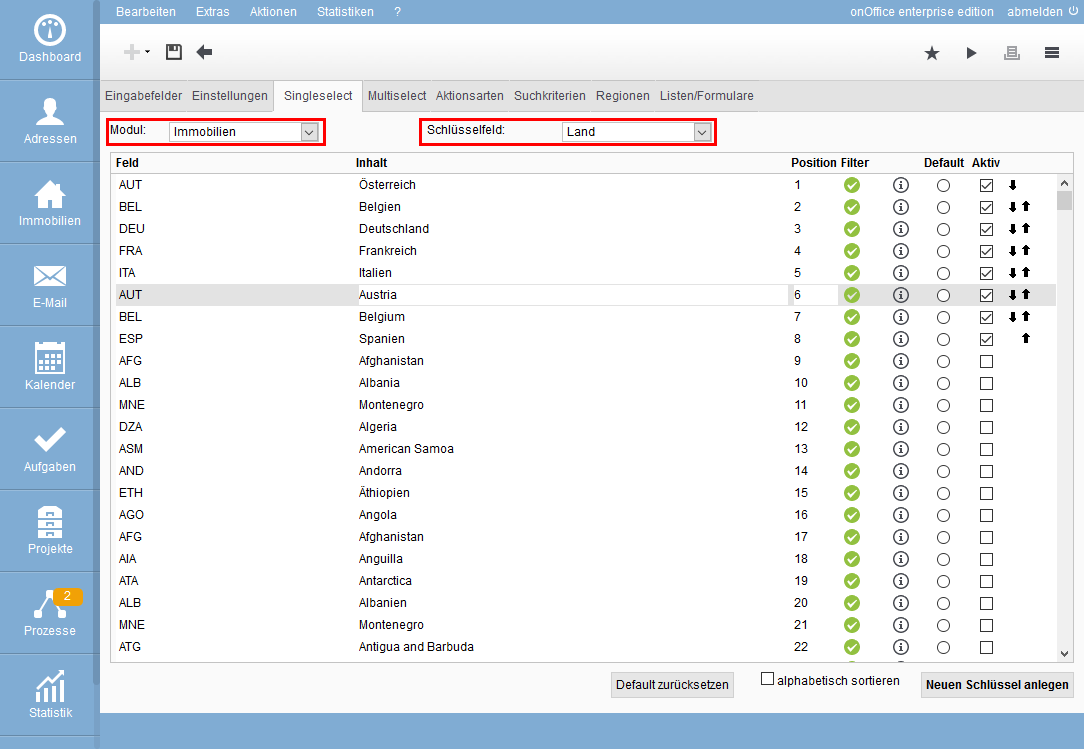
As an example of a single-select field, we will take the Country field and explain where and how you can find the correct designations. The land is required for onOffice.
Please switch to the “Singleselect” tab, select the “Addresses” module and search for the “Country” singleselect field. However, the Country entry is not visible. Some fields, such as the country, exist in the address data records and in the property data records. The configuration is then only carried out in one module. For our example country, we must therefore select “Real estate” as the module. Then we can also select the single select field “Country”.
If you do not know which spelling onOffice uses for a country, you can look it up in the list.
Please replace all country information in the table with the corresponding spelling in onOffice.
If you have stored notes for your addresses, this is a little more complicated. In onOffice there is no Notes field by default. You can transfer the notes to the Remarks field or create a separate field of the type “Text”. This explains how you can create your own field.
Creating the import file
Once all entries have been adjusted, please save the file once. We need the so-called “CSV file” for the import. Even if you have started with a “CSV file” to be on the safe side, we will still create a “CSV file” in Excel. Please select File >> Save as and select the file type “CSV (delimiter – separated) (*.csv)” and save the file in a location where you can find it again later.
Sample file for download
Attached you will find a sample CSV file which shows you what a CSV file could look like.
Download: CSV sample file
Import into onOffice
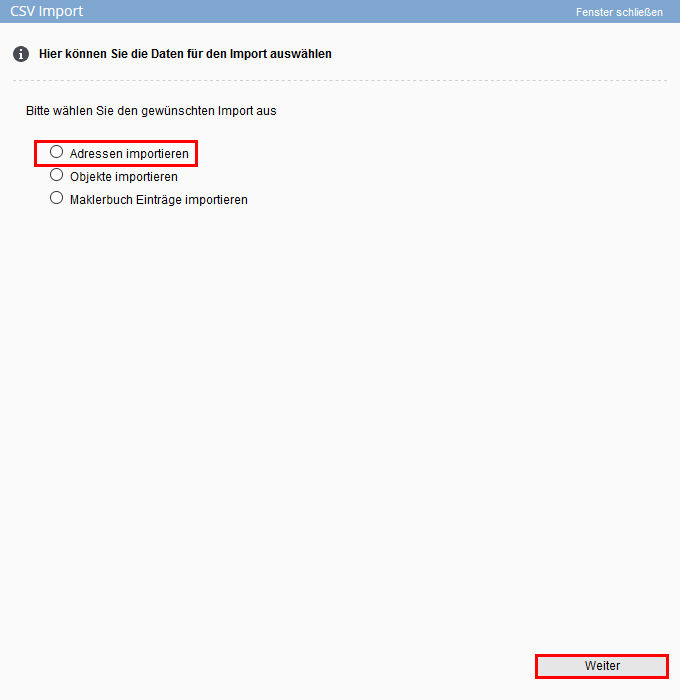
The import dialog is started in the menu Extras >> Data import from CSV/IMV .
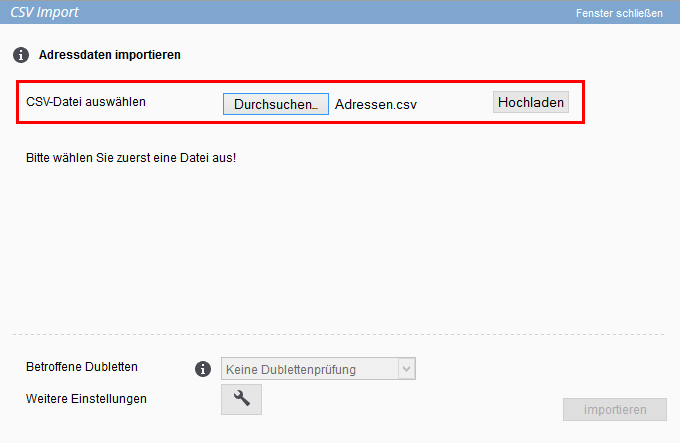
On the first page, please select Address as the type and click “Next”. On the second page, the file just created is uploaded for import.
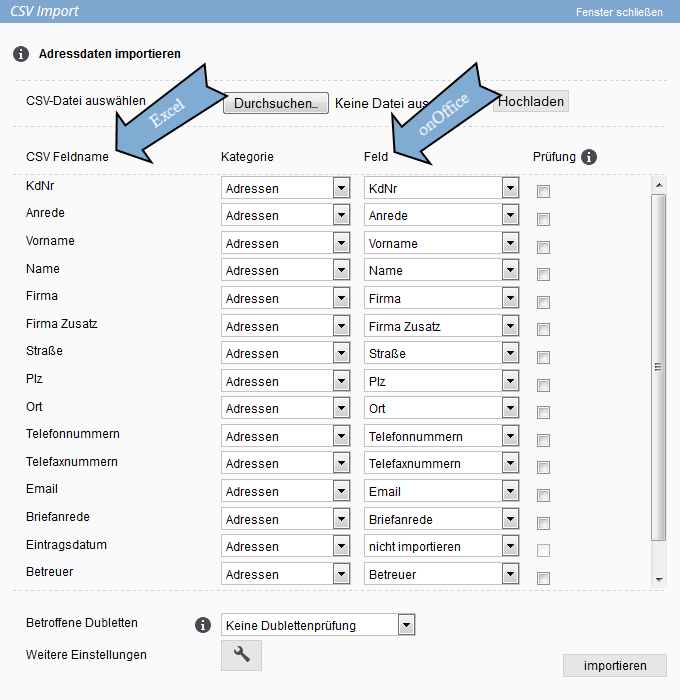
After uploading, the file is automatically opened and read. Each column in the file is shown in the list on the left-hand side under CSV field name. The middle column (Smart Category) should always be set to Address. In the right-hand column (Smart field), you determine the field in onOffice in which the corresponding values are to be entered. If the column heading corresponds to the name in onOffice, this is entered automatically. In other cases, you must make this assignment. Please also check the automatic assignment.
Example 1:
The left-hand column contains the name Tel, which is also entered in the Excel table. The Tel. field corresponds to the Phone number field in onOffice. Please select this from the list in the right-hand column.
Example 2:
In the left-hand column there is a field such as “Trade fairs attended”. There is no suitable counterpart for this in onOffice. You can select “Do not import” if you do not need the information. If you have not yet assigned it elsewhere, you can also select the “Comment” field. Otherwise you must cancel the import here and first createa suitable field in the administration. The “CSV file” must then be recreated and the import process restarted.
Please assign all desired columns of the Excel file to a field in onOffice. Columns that are not required are assigned to “Do not import”.
You can activate a duplicate check. Address data records in onOffice are checked against the imported addresses. You can call up a brief explanation by clicking on the I symbol next to the duplicate check.
“No duplicate check” is selected here by default. If you have not yet created any or only a few addresses in onOffice, this is also the right choice.
If you already have many address data records, you should contact technical support (0241/44686122).
Click on “Import” to start the import.
The result is displayed after the import. Here you can see how many data records have been imported, whether data records have been updated or whether data records have been rejected, etc. If you have any questions about the statistics or problems, please leave the window open and contact technical support (0241/44686122).

 Entry
Entry Dashboard
 Addresses
 Properties
 Email
Email Calender
 Tasks
Tasks Acquisition Cockpit
 Audit-proof mail archiving
 Automatic brochure distribution
 Billing
 Groups
 Intranet
 Marketing box
 Multi Property module
 Multilingual Module
 onOffice sync
 Presentation PDFs
 Process manager
 Project management
 Property value analyses
 Request manager
 Showcase TV
 Smart site 2.0
 Statistic Tab
 Statistics toolbox
 Success cockpit
 Time recording
 Address from clipboard
 Boilerplates
 Customer communication
 External Tools
 Favorite links
 Formulas and calculating
 Mass update
 onOffice-MLS
 Portals
 Property import
 Quick Access
 Settings
 Templates
 Step by step
