 Entry
Entry Dashboard
 Contacts
 Properties
 Email
Email Calendar
 Tasks
Tasks Acquisition Cockpit
 Audit-proof mail archiving
 Automatic brochure dispatch
 Billing
 Groups
 Intranet
 Marketing Box
 Multi Property module
 Multilingual Module
 onOffice sync
 Presentation PDFs
 Process manager
 Project Management
 Property value analyses
 Enquiry Manager
 Showcase TV
 Smart site 2.0
 Statistic Tab
 Statistics toolbox
 Success Cockpit
 Time Tracking
 Address from clipboard
 Text block
 Customer communication
 External Tools
 Favorite links
 Calculating with formulas
 Mass update
 onOffice-MLS
 Portals
 Property import
 Quick Access
 Settings
 Templates
 Step by step
You are here: Home / Extras / Templates / PDFdesigner / Create PDF Letter Templates

Templates
Create PDF Letter Templates
PDF letter templates are the basis for PDF lettertemplates. In the PDF letter templates, area and data are assigned with content, which is then fixed for several different letter templates. Thus, in a way, it corresponds to a corporate stationery. The other areas with letter content etc. are then filled with content in the PDF letter template.
The PDF letter templates are created from so-called starter templates. Starter templates are fixed and are maintained by onOffice.
The starter template specifies the elements of the letter template and determines which of them are considered part of the template and which belong to the letter template. The dimensions of the areas and their distances from each other is also fixed. Page margins, font sizes and types, and colors can be changed later in the basic settings of the template.
The components assigned to “Template” will be filled with content in PDFdesigner, the components assigned to “Template” will be filled in template management and then in letter dialog when creating letter. The finished document is then the combination of all areas.
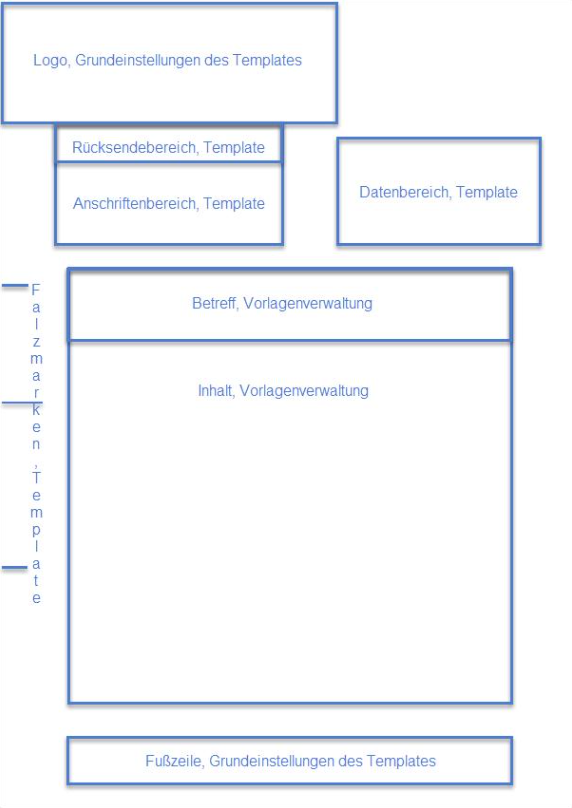
Example structure for sample template “DIN 5008 B (Standard)” from the starter template “DIN 5008 B”
The sample template for the DIN standard letter includes several areas, the areas and their assignment can be seen in the following diagram, the size and position of the areas is specified in the starter template.
You can create letter templates at your leisure, check them via the preview in the action bar and when everything is ready release them for use in PDF letter templates via “Activate PDF”.
This also applies to changes, only when they are published (Actions bar), they will be used in the corresponding PDF letter templates.
With the plus icon ![]() in the upper left corner you can create a new PDF letter template. Please select the PDF Letter Template tab in the lightbox.
in the upper left corner you can create a new PDF letter template. Please select the PDF Letter Template tab in the lightbox.

First you need to name your PDF letter template and choose a starter template from the preview list on the left. Then click on “Create PDF letter template” at the bottom right.
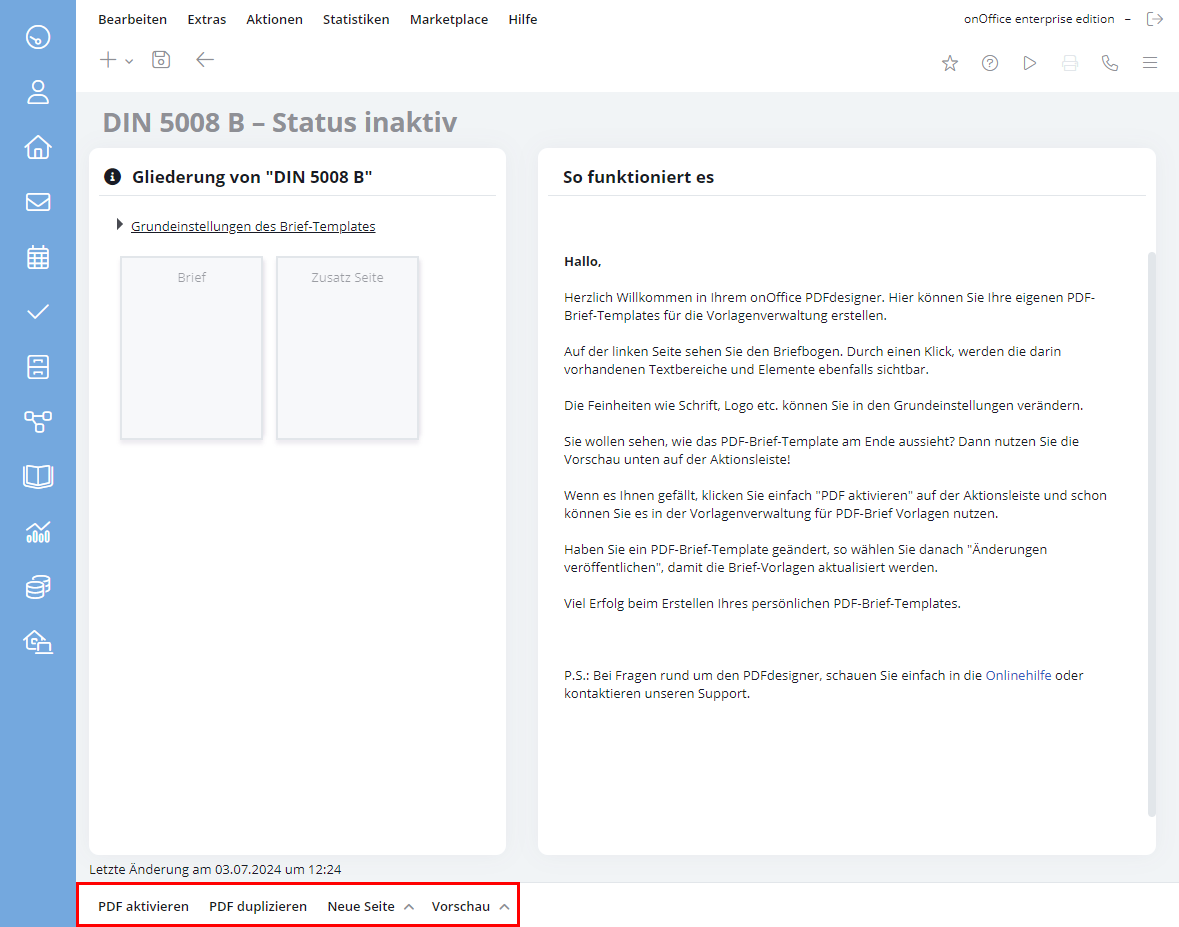
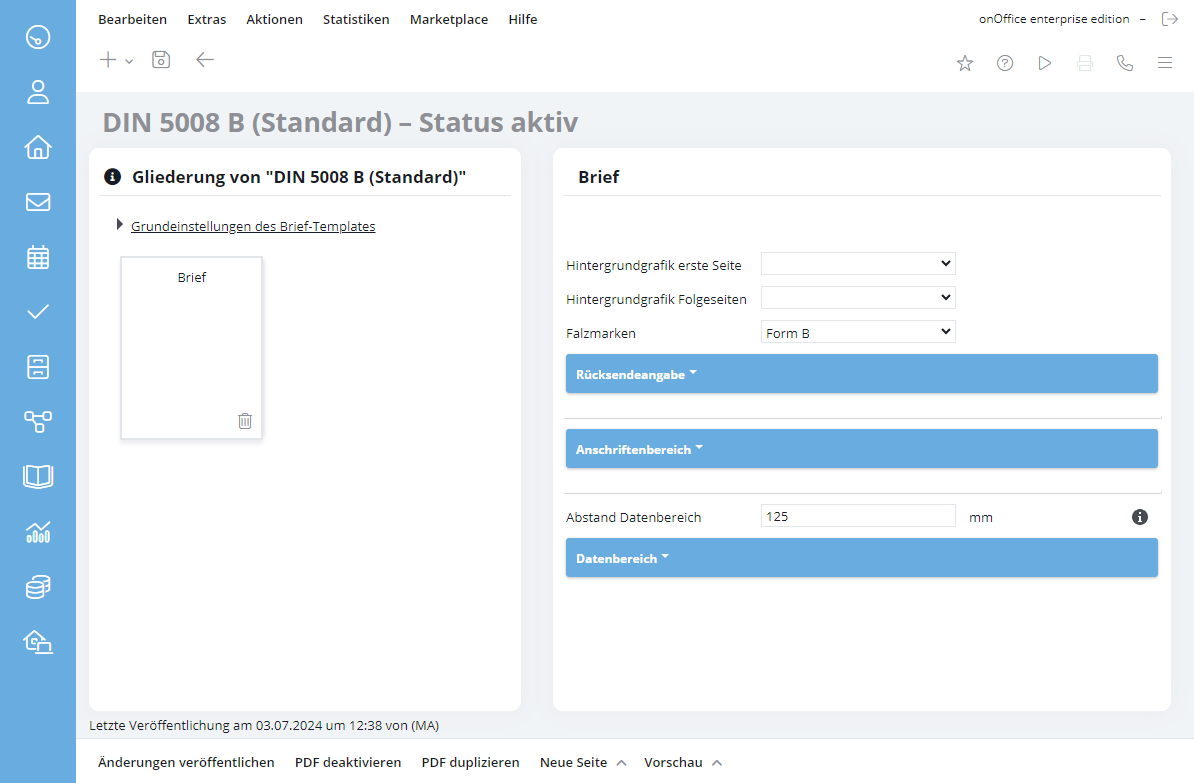
The PDF letter template is created and opened directly for editing. On the left side you can see the outline of your PDF letter template. Initially you will see only the “Letter” page. Above you will find the link “Basic settings of this letter template”.
On the right you will find “This is how it works”, a small orientation guide for the PDF designer.
The default settings for the sample templates use their CI colors, CI logo and black font.
Please check the settings once and if you want you can change the background graphics and logo as well as fonts and colors, footer here.

We recommend using the CI colors from the basic settings. If another color is desired, please deactivate the checkbox and then select your desired color via the color selection.
To save the settings, click the Save icon in the upper left corner ![]() .
.
Background graphics: To upload a background graphic, first click the “Browse…” button, then select an appropriate graphic in the following window and click “Open”. The file name is displayed next to the “Browse” button. Click on “Upload” to save the file in the basic settings.
Up to 12 different graphics can be stored via “+ Additional background graphic”. One of these graphics can be selected on each page of the letter template. The graphics should be created in DIN A4 format by them. Please note that you will need to save again for the background graphics to be saved permanently.
Spot color: This sets the color for bars, frames, separating elements. We recommend using the CI colors from the basic settings, in this case that would be the “main color”.
Font type, size, color and alignment: The basic font and its layout are set for the letter template. There are Office comparable fonts available, you can open a PDF with examples via the link “Show font examples”. An often used font is e.g. Arial, which is represented in PDFdesigner by Tex Gyre Heros.
Show logo: Select whether a logo should be displayed. You can upload a logo, otherwise it will be taken from your basic settings. If you are in a group, the logo will be taken from the group settings of the corresponding group.
Furthermore, you can determine the dimensions and the position of the logo.
Margins: By selecting the template, DIN relevant margins are preset in millimeters, but they can be changed by them.
Footer: If the checkbox is set, the footer settings per page will be respected. The configuration of the footer is fixed here for the entire letter template.
You can also disable the use of the footer here by unchecking the checkbox. Individualization of the footer can be done via the link ‘individual footer’. You can define footers for different languages using the language selector at the bottom right of the lightbox. The language used in the brochure is based on the language of the interested parties.
Advanced settings: Under advanced settings you can set distances from header & footer to page margin, the header itself and whether to ignore the ‘Price on request’ option in property. Please note that either the header or the logo can be active. The header can be defined for multiple languages.
If the “Higher quality images” option is activated, original images – if available – will be included. Images in PDF letter templates can be included e.g. via the OSG_BILDER macro .
To save the settings, click the save icon in the upper left corner ![]() .
.
By clicking on the icon of the letter page, you can add content to the elements inside it. This content is then fixed in the PDF letter templates based on this PDF letter template and cannot be changed when creating the letter.
The content elements are displayed on the right side, with the arrow in the category name the text boxes can be expanded and collapsed. If there are layout options or other configuration items, they will be displayed there as well. The CKEditor is used in the content areas.
Here you can, for example, select background graphics, set fold marks and define return information, address area and data area. Which categories are displayed here depends on the selected template for your PDF letter template.
The value entered at Distance Data Area defines the distance of the data area to the left page margin. A value of 125 mm corresponds to the standard for letters according to DIN 5008.
You can add more pages to the PDF letter template using the “New Page” selection on the Actions bar. The new page will be added as “individual page”, there you can include images or ready PDF documents – even multi-page ones. Text areas are not possible. To delete such a page, select the corresponding page and click the trash can icon at the bottom right of the page’s display.
With the selection “individual file” you can integrate an existing PDF document into the brochure. In this case, please check the settings for displaying the logo and footer.
With the selection “property File” you can include from the property a picture or a PDF document deposited there. Attention, only PDF documents or images can be processed, other documents will be ignored when creating the brochure.
Which file is to be taken can be determined on the one hand via the file type. If there are several files of the same type, the first matching one is always taken. On the other hand, this can be done via the document characteristic, these can only ever be assigned once per property.
You also have the option here to display the footer and header – if active in the basic settings – via the settings. The header can also be created individually via the Advanced Settings.
You can duplicate with letter templates, add more pages, etc. You can find the corresponding entries in the Actions bar:
- Activate PDF / Publish change
- Duplicate PDF
- New page
- Preview
If you want to see in advance how your letter template will look like, you can assign a property and an address under “Preview” and view your individual letter template. In the case of letter templates of the billing document, i.e. in the case of the document templates Document (DIN 5008 A) and Document (DIN 5008 B), you can generate the preview of a document.
When you are satisfied with your letter template, click “Activate PDF” at the bottom of the Actions bar. After that it will be displayed in black font in the list of letter templates in PDFdesigner and can be used in template management .
When making changes to an existing letter template, you must use the Actions bar to “Publish Change” so that it is applied to the PDF letter templates.
A created PDF letter template should not be used directly in a PDF letter template, but only when it is complete. Therefore, in order to be able to use it in the template management, the PDF letter template must first be activated. To do this, please click “Activate PDF” in the Actions bar.
As in other list views, you can directly see in the list view in PDFdesigner which letter templates are active (black font) and which are inactive (gray font).
Open the PDF letter template from the list view in PDFdesigner to change content or layout. Via the outline on the left you can select the pages of the letter template and change the content, or via “Basic settings of the letter template” you can change colors, font etc.
Please remember to save all changes. You can check the changes by clicking Preview in the Actions Panel.
As with creating a letter template, the changes do not take effect in template management until the change is published. To do this, please click on “Publish changes” in the action bar.