 Introduction
 Dashboard
 Addresses
 Properties
 Email
Email Calender
 Tasks
Tasks Acquisition Cockpit
 Audit-proof mail archiving
 Automatic brochure distribution
 Billing
 Groups
 Intranet
 Marketing box
 Multi Property module
 Multilingual Module
 onOffice sync
 Presentation PDFs
 Process manager
 Project management
 Property value analyses
 Request manager
 Showcase TV
 Smart site 2.0
 Statistic Tab
 Statistics toolbox
 Success cockpit
 Time recording
 Address from clipboard
 Boilerplates
 Customer communication
 External Tools
 Favorite links
 Formulas and calculating
 Mass update
 onOffice-MLS
 Portals
 Property import
 Quick Access
 Settings
 Templates
 Step by step
You are here: Home / Extras / Portals / Setup / Portal Interfaces Configuration / Setting up a new portal interface

Portals
Setting up a new portal interface
In general, in the “Marketing” tab of the property, the user only sees the portal interfaces.
Add portal interface
The configuration of the portals can be found under . Use the plus ![]() icon or to open the list of available portal interfaces. You can enter the name of the portal or limit the list via Filter (Price / Home country / Free interfaces). Portals that have already been added no longer appear in the list.
icon or to open the list of available portal interfaces. You can enter the name of the portal or limit the list via Filter (Price / Home country / Free interfaces). Portals that have already been added no longer appear in the list.

Please select the desired portal from the list and add it by clicking the button “Add portal”. You also have the option of transferring existing file shares from other portals to the newly created portal. At the end of the input mask, select the desired portal from which the releases are to be transferred.
Portal Interface Settings
Once you have added the desired portal interfaces, you can enter the access data. Please select the appropriate portal from the list and enter the required access data.

Please save the settings now. The system checks whether it is possible to register with the portal. If a connection is possible, the “FTP access data check” turns green and reports “FTP connection OK”.
You can use the “Portal name” field to customize the displayed name. You can specify additional settings for the transfer of images or boundaries or property rotation using the Advanced Settings.
Portal interface advanced settings
You can make further settings for“FTP/ SFTP mode”in the “Advanced settings”. Please note that only SFTP or unencrypted FTP are supported as protocols for a transfer, but not “FTP with TLS”.
Other settings such as images, automatic portal export, object rotation etc. can also be made.
A detailed explanation of the individual settings can be found here.

Activate portal interface
Once all access data and settings have been entered, the interface still needs to be activated so that it is visible in the properties in the Marketing tab. To do so, please check the box “Active” and save afterwards.
Portal interface in groups
With the group module you can activate/deactivate the portal interfaces for each group individually and also store different access data. You can also set an FTP folder at group level.
The same applies to groups. In the “Marketing” tab of the property, the user is only shown those portal interfaces that are active and for which valid access data is stored.
When activating a portal interface in the basic settings, a query then appears asking whether the portal should be entered as activated or deactivated for all groups.
The settings for portal interface at group level can be made in the group administration or in the portal interfaces of the basic settings.
Group portal settings in the basic settings
In the portal configuration of the basic settings, the configuration for all groups can be checked and changed for the selected interface. The configuration is opened via the action bar – “Group portal settings”.

All existing groups and their configuration data for this portal interface are displayed. In the “Active” column, you can activate ![]() or deactivate
or deactivate ![]() the portal interface for this group. You can enter data in the fields and use the “Check” button on the right side of the line to check the connection and login data. The result e.g. “FTP connection OK / FTP connection not possible” is then displayed. Please save your entries afterwards with the “Save” button in the bottom right corner.
the portal interface for this group. You can enter data in the fields and use the “Check” button on the right side of the line to check the connection and login data. The result e.g. “FTP connection OK / FTP connection not possible” is then displayed. Please save your entries afterwards with the “Save” button in the bottom right corner.
Data in gray font is displayed if no entries have been made in the group for this field. In this case, the data from the basic settings are taken over.
Data in black font is displayed if there are entries for this field in the group.
If no data has been entered either in the basic settings or in the groups, the field is empty.
Group portal settings in the group administration
Portal settings in groups can only be stored for office groups.
In the tab “Portals” of the group administration all portal interfaces are displayed that have been activated in the basic settings.
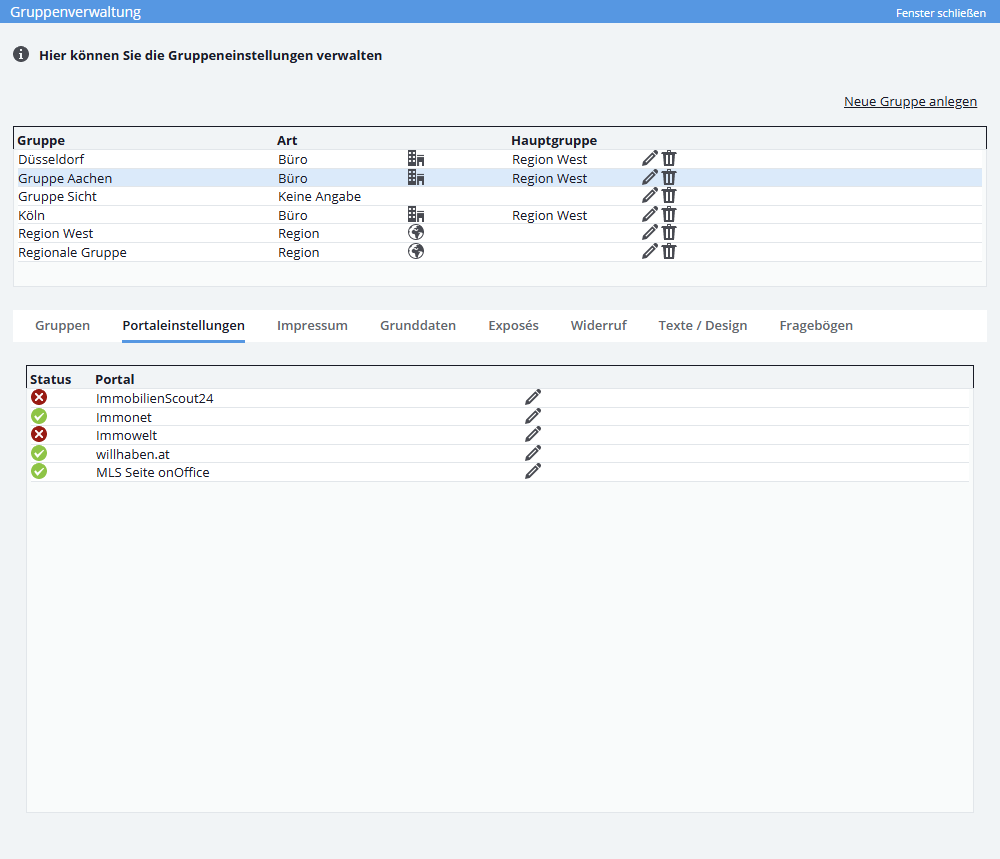
Activation / deactivation is also possible on group level, a click on the status symbol ![]() / in
/ in ![]() front of the portal name changes the status.
front of the portal name changes the status.
Via the edit symbol ![]() you can now enter or change the individual access data for each of the portals. Here, too, the connection is checked and the result displayed when saving.
you can now enter or change the individual access data for each of the portals. Here, too, the connection is checked and the result displayed when saving.