You are here: Home / Extras / Settings / User / User details / Rights

Settings
Rights
Inhaltsverzeichnis
- General
- Video – User rights
- Extended rights in the “Rights” tab of a user
- Extended rights in a record
- User template
- Allocation of rights to office and regional group
- List of the rights of a user
- Contact management
- property tracking
- Search criteria
- Task management
- Project management
- Follow-ups
- Schedule management
- Recording of working time
- Record rights
- Internal services (with costs)
- Marketplace – external services
- Employee statistics
- Statistics
- Logging/Statistics
- Description of rights
- Transaction
- Property
- Agent’s log/activities
- Word/Email templates/files
- Further modules
- Export / Print lists
- Process Manager
- Web page modules
- smart site 2.0
- Dashboard
- Administrative rights
General
Which contacts, properties or tasks may/should which user see?
Not every user should always see everything, therefore in onOffice enterprise edition you can set the access rights of the users – on the one hand via user rights in general and on the other hand individually per data record. The rights per record overwrite the user rights.
Of course, only users who have the appropriate user rights may restrict or extend the rights.
User rights
In the user rights , you define for each user which rights he or she has for certain modules (e.g. contacts) or areas (e.g. reading emails in activities).
Usually you can choose between the rights “All / Office group / only own / none”. Office group is only available with the Groupsadd-on module.
This assignment of rights can be distributed even more finely, e.g. via extended rights a user can have access to the properties of user XY in addition to his own properties.
Rights per record
In almost all data sets you can call up the data set rights via the action bar (usually Action bar >> Other actions) and extend or restrict the rights for users / groups.
Rights management
The rights can be fine-tuned, and setting up or adjusting the different rights for each user can be very time-consuming.
We therefore recommend that user rights are managed and assigned using rights templates , groups are also a way of structuring rights. This allows changes to rights to be made quickly and easily.
In general, individual rights per data record are assigned, making rights management difficult and should only be done in individual cases
The rights per data set for several data sets is possible via a mass update , please plan this carefully.
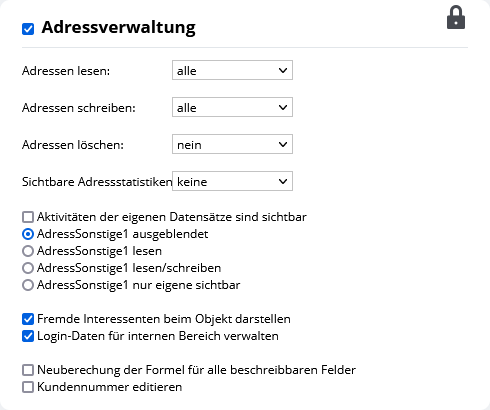
In addition, there is the simple rights management, which is missing the lock![]() symbol in the upper right corner of the individual categories. No rights on record levels are possible here and no extended user rights. A short description of the simple rights management contains only the user rights that are different.
symbol in the upper right corner of the individual categories. No rights on record levels are possible here and no extended user rights. A short description of the simple rights management contains only the user rights that are different.
Below you will find details about the extended user rights, the rights per record and then the list of categories of user rights with a short description.
Video – User rights
Extended rights in the “Rights” tab of a user
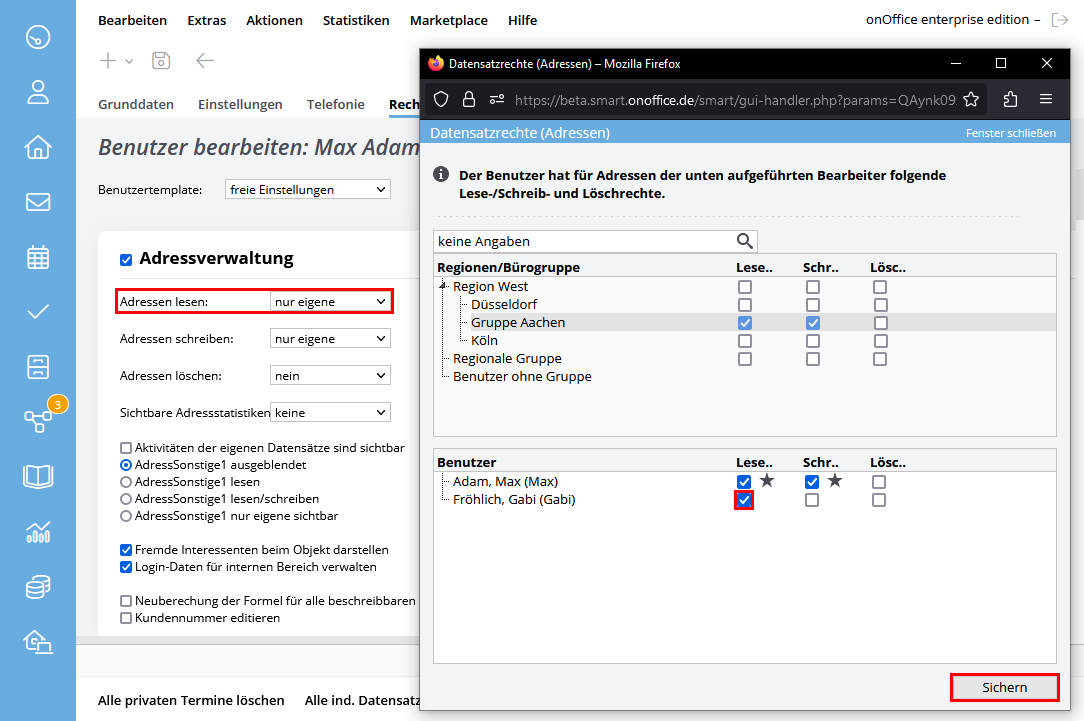
The basic rights that are assigned in the selection field always refer to the maintainer of the data set. Possible depending on the scope of your additional modules: None, own, office group, regional group, all. With the assignment of extended rights via the lock symbol, the level “individual” is added.
The lock icon opens the popup of extended rights.
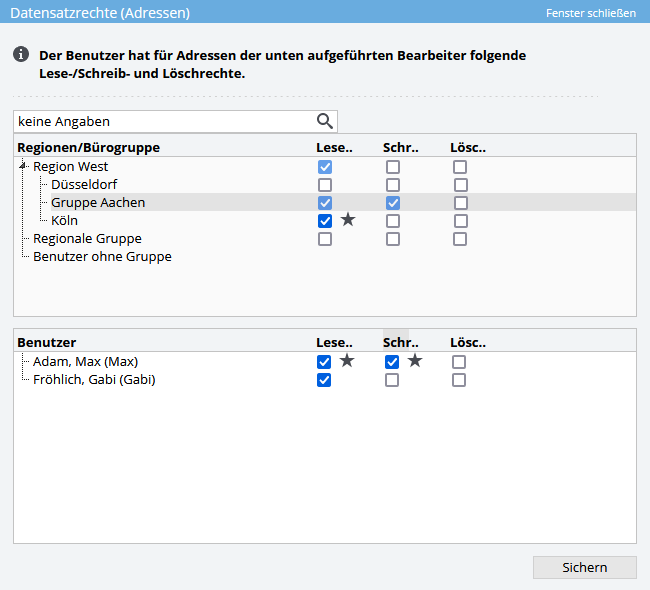
The popup with the extended rights opens. This lists all users and groups that are available. You can now assign read and write rights. A change of rights is indicated by a star symbol after saving. Click on the star symbol to undo the change.
Example: The user “Max Adam” is only allowed to see his own contacts, that means only contacts where he is registered as a supervisor. Via the record right it can now be defined in the user rights that he is additionally allowed to see the contacts of the user “Gabi Fröhlich”. In total, he can see and open all contact data records in which either he himself or user “Gabi Fröhlich” is specified as the maintainer.
Via Action Bar >> All ind. Delete record permissions, an administrator can reset all changed record permissions in the individual records . This means that all data records (contacts, property …) are checked and any record rights set for the current user are deleted. Only record permissions are deleted and no permissions in the tab Permissions of the user
Extended rights in a record
Assign rights
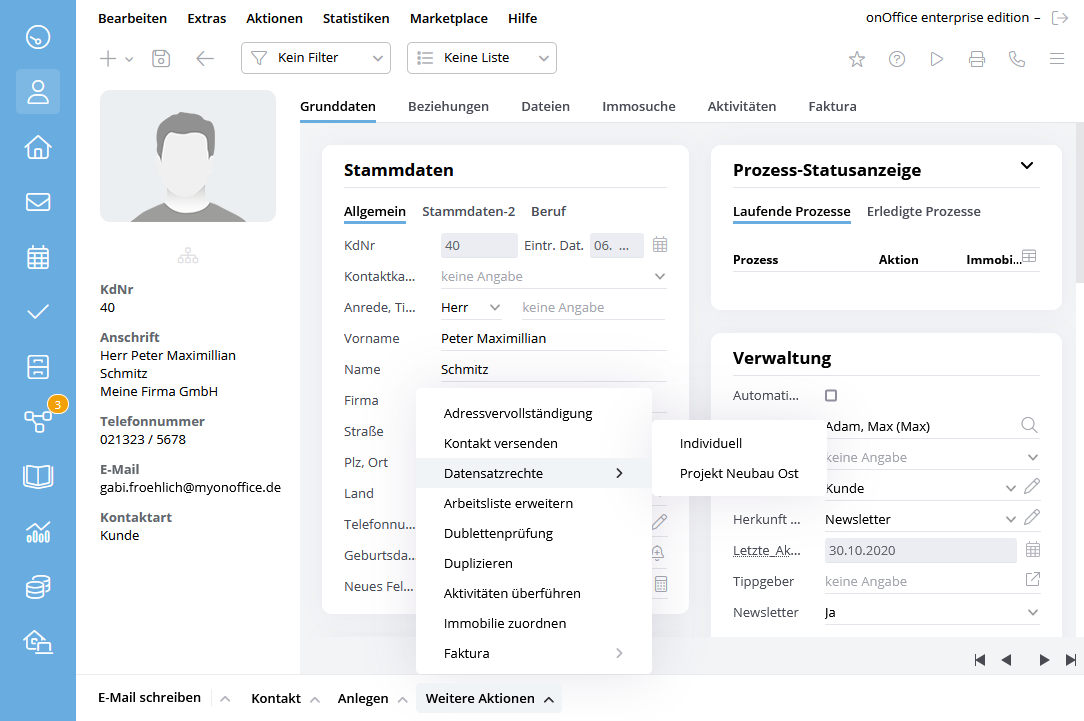
In a single record – the supervisor is user 3 – the extended rights can also be used to assign specific rights for individual users or groups. The extended rights are assigned via Action bar >> Further actions >> Record rights or if you use dataset rights stamps via Action bar >> Further actions >> Record rights >> Individual.
The popup with the extended rights opens. It lists all users and groups that exist. You can now assign read and write rights. A change of rights is indicated by a star symbol after saving. Click on the star symbol to undo the change.
Example: The user “Max Adam” is a member of the group “Aachen” and the maintainer of the contact record. In addition, he is also granted read rights to the contact data records of the “commercial property” group.
Display and change existing rights
You can control which rights are assigned or effective for the individual data record. To do this, open the data set and select Action bar >> Other actions >> Data set rights. In the popup, select the desired user and you will be shown which rights are available for him/her in the data record. If the general user rights for this record have been changed via the record rights, an asterisk is displayed at this point. Click on the star symbol to undo the change.
Please do not forget to save.
Record right stamp
With the record rights stamp, you can set a specific rights constellation in different records via the popup for record rights.
This is possible at all places where the record rights stamp appears in the record rights popup or where a drop-down menu with the existing record rights stamps appears in the action bar entry for the record rights.
Record privilege stamps are available only for users with the User right “Extend and Restrict Record Privileges”.
Create and manage record right stamps
Record permission stamps are created and managed in the Record Permissions popup. A separate list of stamps is kept for each user.
You can save the currently available rights selection in a stamp by entering a name in the field and clicking on the diskette ![]() symbol to save it.
symbol to save it.
When you select a stamp, you can change the rights set and save the stamp again, or delete it using the trashcan ![]() icon.
icon.
When a stamp is selected, the corresponding rights settings are entered in the popup, but are not yet saved.
Apply record right stamps
Applying the dataset right stamp is possible in 2 places.
In the record rights popup select the desired stamp and save the new settings with the Save button. After reopening the record rights popup again, the set rights and the star ![]() symbol are displayed with the changed rights.
symbol are displayed with the changed rights.
The other place is directly in the record itself via the entry in the action bar, usually Action Bar >> More Actions >> Record Rights >> Stamp Name.
There the entry “Record rights” is extended by the list of existing stamps. You can select and set a stamp directly.
A record right stamp only sets exactly the rights specified there for the users and groups present in the stamp, all other users / groups are deprived of their rights.
This means that even after a change of group, a user still has the rights assigned to him.
Attention, a set record right stamp cannot simply be undone.
You have to remove all individual entries by the stamp, i.e. click on all star symbols for all users.
Mass update of the record rights
You can also change the record permissions for multiple records, see herefor instructions.User template
User templates offer a possibility to assign a set of predefined rights for the different user roles instead of assigning them manually.You can create, change and edit user templates under the following link.
Allocation of rights to office and regional group
If you use the Groups module and the user is in an office group that belongs to a region group, you can set for this user in most selectors whether he is allowed to view the data of the office or region group. If you have set ‘region group’ for some rights and remove the office group from the region group, the rights are downgraded to ‘office group’.
List of the rights of a user
Contact management
In the rights administration for the contact administration you can set which contacts you are allowed to read, write or delete. You will also find some additional settings for the contact management, e.g. whether the customer number should be editable.
property tracking
Search criteria
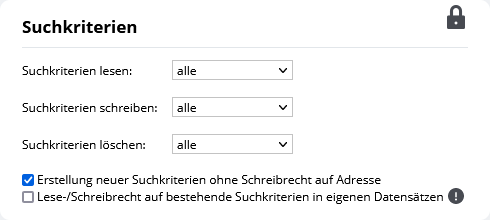
In the rights settings for the search criteria, you can select the search criteria for which you have read, write and delete rights.
If the field “Read/write permission on existing search criteria in own data records” is activated, the other permission settings for the search criteria are ignored for contact data records on which the corresponding user is the maintainer himself and he always has read and write permission there.
The right “Creation of new search criteria without write permission to the contact” also allows to create search criteria in contacts to which the user has no write permission.
Task management
In the rights settings for the task management you can choose which tasks you are allowed to read and whether you are allowed to delete individual tasks.
Project management
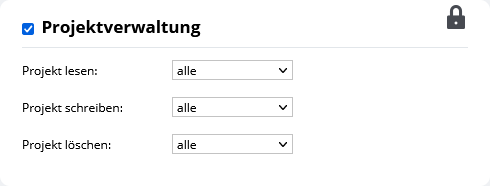
In the rights settings for the project management you can choose which read, write and delete rights you want to set for projects. So you can choose whether you or the user for whom you are editing the rights may only edit your own projects or all of them.
Follow-ups
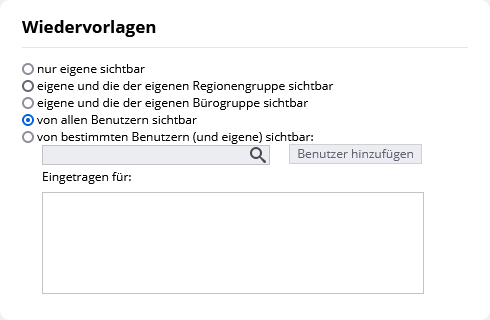
Define which resubmissions a user may see.
Schedule management
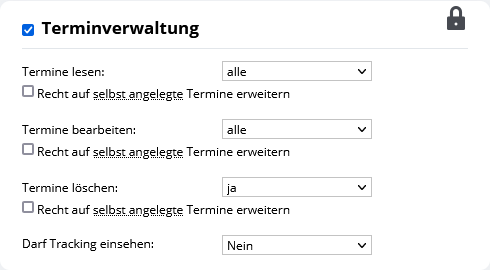
Here you can set which appointments the user is allowed to read, edit or delete. In addition, the rights can be extended to self-created appointments. In addition, you can decide whether the tracking of the template can be viewed.
Recording of working time
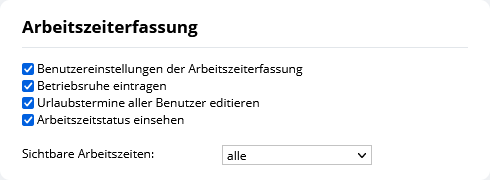
In the category Working Time Recording you can set whether the user is allowed to view and set the working time recording of other users.
Furthermore, it can be determined whether the user has the right to enter or delete a company holiday, or to edit or delete holidays of other users.
The “View working time status” permission controls whether the user can view the “Working time status” item in the “Statistics” menu. Information about the current work and working hours of all users can be viewed there, such as start of work, break, current appointments and tasks.
With the selector “Visible working times” you can set which working times are visible for the user.
Record rights
Who is allowed to view or change the record rights? This is regulated by the user rights category “Record Rights”.
Internal services (with costs)
Here you have the possibility to define for each user if he is allowed to use the credit (e.g. SMS) via the general account or if he should create a separate account for his user. This is set to client account by default. Further information on how to create a user account for the user can be found here.
Marketplace – external services
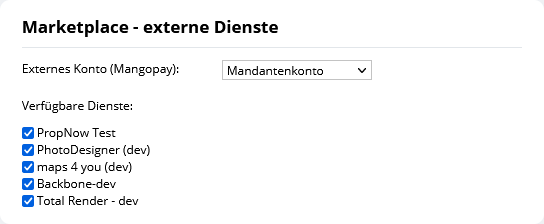
In this category, you can specify which Marketplace account (client/group/user account) is used to bill the services of the various providers. If “No account” is set, only certain free services can be used without a billing account.
In addition, you can set which providers the user is allowed to use.
Employee statistics
For the employee statistics/statistics , you can define here whether only your own, the office group’s or all of them may/may be viewed.
Statistics
- Option “Visible statistics”
Statistics evaluate the records to which the user has access. Here you define which data records the user may use for the evaluation. In addition, the user must also have read rights to the individual data records. - Option “Manage widget configuration”
This defines for whom the user can create statistics templates. - Option “Assigned Configuration”
This selector allows you to assign the statistics module configurations you have stored to the selected user. This is displayed in the first tab.
Logging/Statistics
In this category, you can specify which recently viewed data records the user can view. Normally it is set that the user can only view his own records. Additionally, the records of the office/regional group and all of them are available.

Description of rights
Here you have the possibility to give an explanation for which reason the user has been assigned the corresponding rights.
Transaction
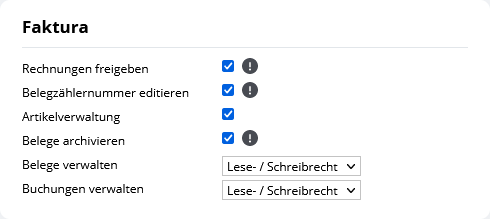
Set the user rights for the billing module here.- Release invoices: Via “Release invoices” the user is able to release contacts for invoicing. Without the right, the contact field “Release invoice” is blocked and, in addition, when a user with this right changes invoice-relevant data , no task is sent to the group / user entered under Basic settings >> Invoice at “Responsibility invoice release”.
- Edit document counter number: Invoice and credit note numbers can be edited in the basic settings . Please note that when issuing invoices you must comply with the principles of proper keeping and storage of books, records and documents in electronic form and for data access (in short: GoBD) are subject to. These oblige, among other things, to keep a consecutive invoice number. Please take this into account when distributing this right.
- Article management: Right to access the article management under Invoice >> Articles.
- Archive documents
- Manage vouchers
- Manage bookings
Property
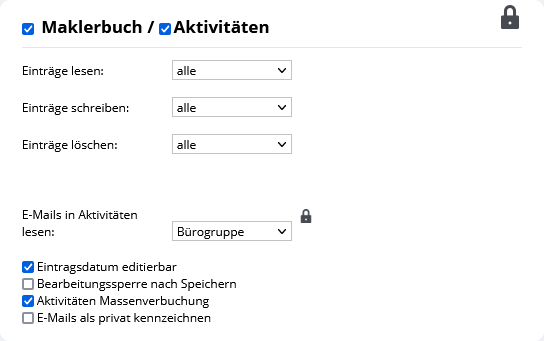
Agent’s log/activities
Next to the view of the entries, determine if and when the user may delete or change the entries. Likewise, the read rights for “emails in activities” can be set.
With “Activities mass update” you can create entries for several data records in the property search / interested parties .
By setting “Mark emails as private”, generated email activities can only be made visible to users who have access to the sender’s or recipient’s mailbox. A lock icon will then appear in emailcomposer to the left of “Save as draft”. By activating, this email is marked as private.
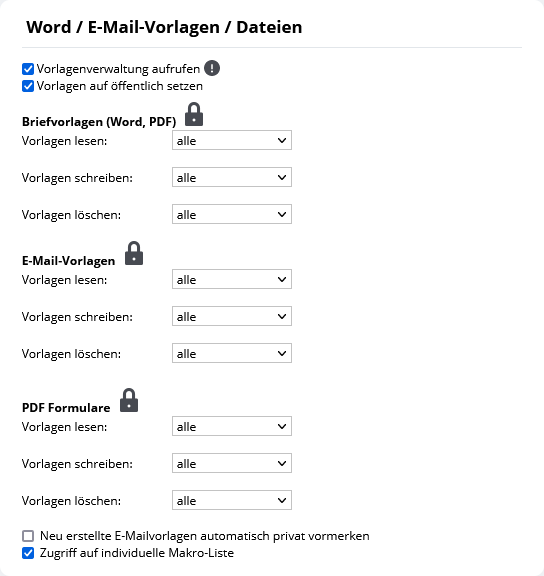
Word/Email templates/files
Provide the user with the template administration here. Use “Access to individual macro list” to give the user access to the individual macro list.
Further modules
Define here whether the user may use the other modules or not. In the case of Messenger, you can also specify whether the user is allowed to delete conversations. If you have enabled the sync function, you will find an explanationhere.
If “Set onOffice Sync in addresses for other users” is active, the user can also activate addresses for sync for other users under “Actions >> Mass update >> Addresses >> onOffice Sync”.
The Whatsapp module offers the option of opening “WhatsApp Web” from an address, including the target contact and message, by calling up the URL and, if desired, sending brochures. In addition, appointment confirmations can be sent via “WhatsApp Web” using the appointment pop-up.
Export / Print lists
Specify here whether the user is allowed to perform exports and print files. If the right to print lists is not granted, the user can still print his appointments.
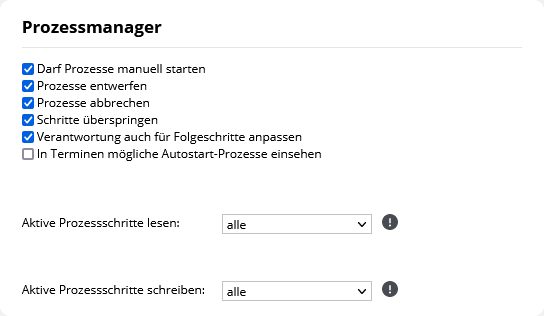
Process Manager
Here you can define which rights the user has for processes. You can individually verify starting, drafting, canceling, and skipping. In addition, you can set whether the selected user is also allowed to read and write processes of other users. If the right “only own” is set, processes can also be edited which are the responsibility of the user’s group.
Web page modules
Specify here which web page modules the user may use.
smart site 2.0
Specify here whether the user in smart site 2.0 can read all pages or only those created by him.
Dashboard
Here you can find the user rights for the dashboard.
Using the selector behind ‘Assigned Configuration’, you can distribute your pre-defined dashboard configurations to the user. If “Active on entry” is checked, this configration will be displayed after logging in to onOffice enterprise.
“Configure Dashboard” determines whether or not the user is allowed to configure their dashboard. If the checkbox is not checked here, the edit icon is missing on the dashboard and the user can neither add nor remove widgets. The widgets themselves, e.g. for which mailbox the email widget should display the unread emails, can still be configured by the user.
“Configure Statistics” is the equivalent setting for dashboard tabs of type “Statistics”.
Via “Manage Configurations” you determine whether the user has the right to manage dashboard configurations under “Dashboard >> Configuration”. These can be distributed to other users via “assigned configuration”.
“Visible statistics” controls whether only your own, the office group’s or all statistics may be seen.
Via “Manage statistics templates” you determine whose statistics templates the user is allowed to manage.
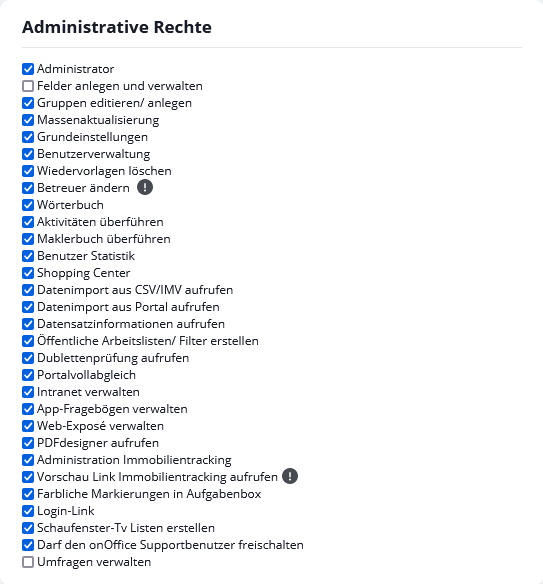
Administrative rights
The administrator right is the most important right of all. With this right the user can set his own rights without restriction. Only grant this right to employees you trust.
Furthermore, you can assign additional individual administrative rights to the user here, such as full portal synchronization.
You can use the “May activate onOffice support user” permission to control which of your users may activate support via the help menu or via a link in an email.
If you want to give your user rights to administer the fields, you can use the “Create and manage fields” right. The “Administrator” right is not required for this.

 Entry
Entry Dashboard
 Contacts
 Properties
 Email
Email Calendar
 Tasks
Tasks Acquisition Cockpit
 Audit-proof mail archiving
 Automatic brochure dispatch
 Billing
 Groups
 Intranet
 Marketing Box
 Multi Property module
 Multilingual Module
 onOffice sync
 Presentation PDFs
 Process manager
 Project Management
 Property value analyses
 Enquiry Manager
 Showcase TV
 Smart site 2.0
 Statistic Tab
 Statistics toolbox
 Success Cockpit
 Time Tracking
 Address from clipboard
 Text block
 Customer communication
 External Tools
 Favorite links
 Calculating with formulas
 Mass update
 onOffice-MLS
 Portals
 Property import
 Quick Access
 Settings
 Templates
 Step by step