You are here: Home / Additional modules / Marketplace / Provider overview / onOffice Services - DocuSign Connector - digital signatures
Marketplace
onOffice Services – DocuSign Connector – digital signatures
1.) Introduction
With our free interface, you can send eSignature envelopes directly from onOffice enterprise.
You have the flexibility to send documents with or without the DocuSign editor. The automatic positioning of the signature fields speeds up the signature process.
Thanks to the seamless integration with onOffice enterprise, you save time and significantly reduce manual effort, while benefiting from DocuSign’s outstanding electronic signature functions.
Video instructions
2.) Administration
To use the service, you must first connect your DocuSign account to enterprise. To do this, call up the “DocuSign Connector >> Administration” service in the Marketplace menu and follow the instructions.
After a successful connection, you can manage your account here. Please note that all administration functions are only visible to administrators. Normal users only see the “User information” tab.
On the “User information” tab, you will find the relevant information about your linked DocuSign account.

All users who are connected to this DocuSign account are listed on the “User management” tab. You can remove users from the assignment to the DocuSign account via “Delete assignments” .
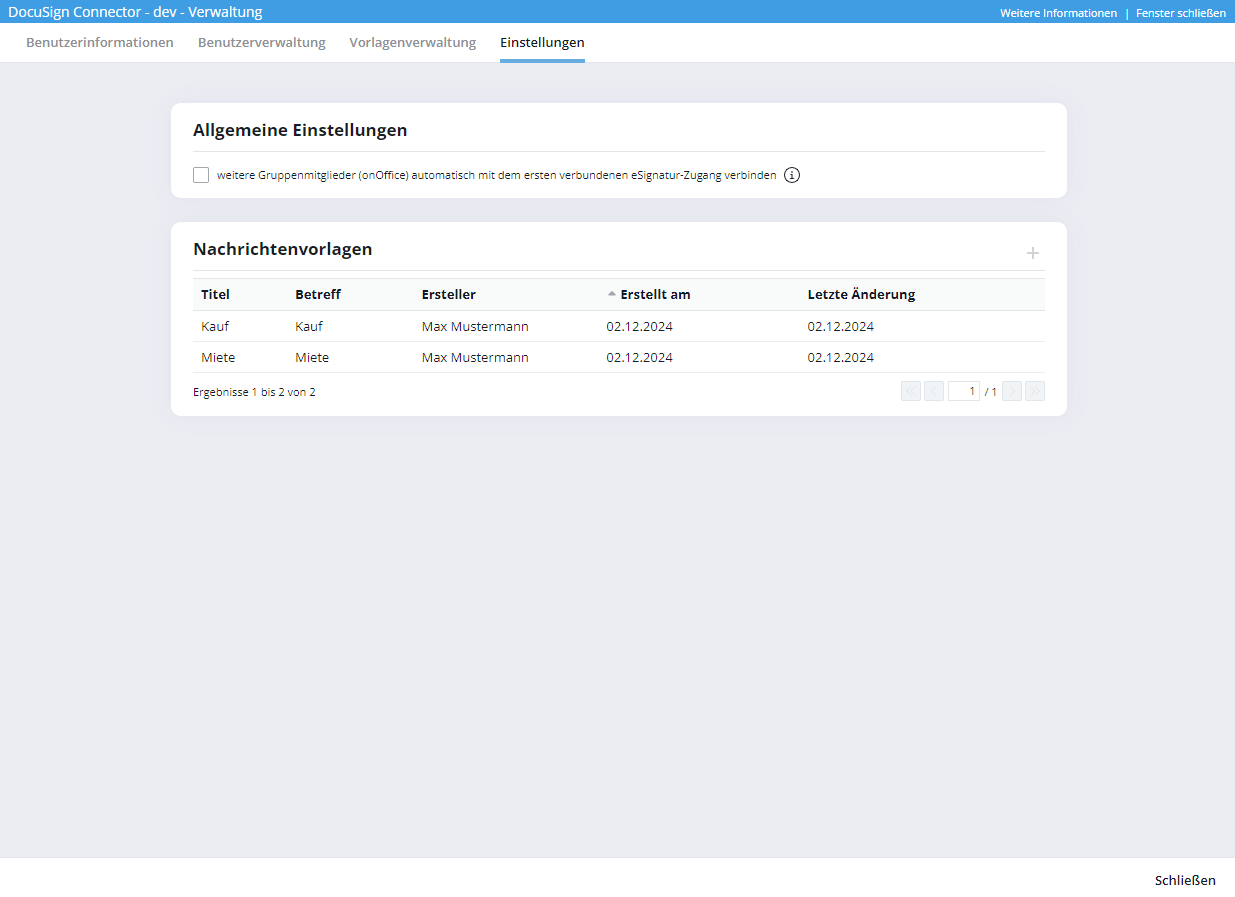
On the “Settings” tab in the “General settings” area, you can specify whether group members from onOffice should be automatically connected to the first connected eSignature access of a group member (e.g. office manager). Attention: This gives all users access to the DocuSign user account and allows them to share it.
These group members are then displayed on the “User administration” tab after you have used the service for the first time.
You can define message templates in the “Message templates” area. The subject and message for the email to the customer can be preconfigured for different purposes. These can then be selected in the “Send envelope” or “Use template” functions.
3.) Obtain signature
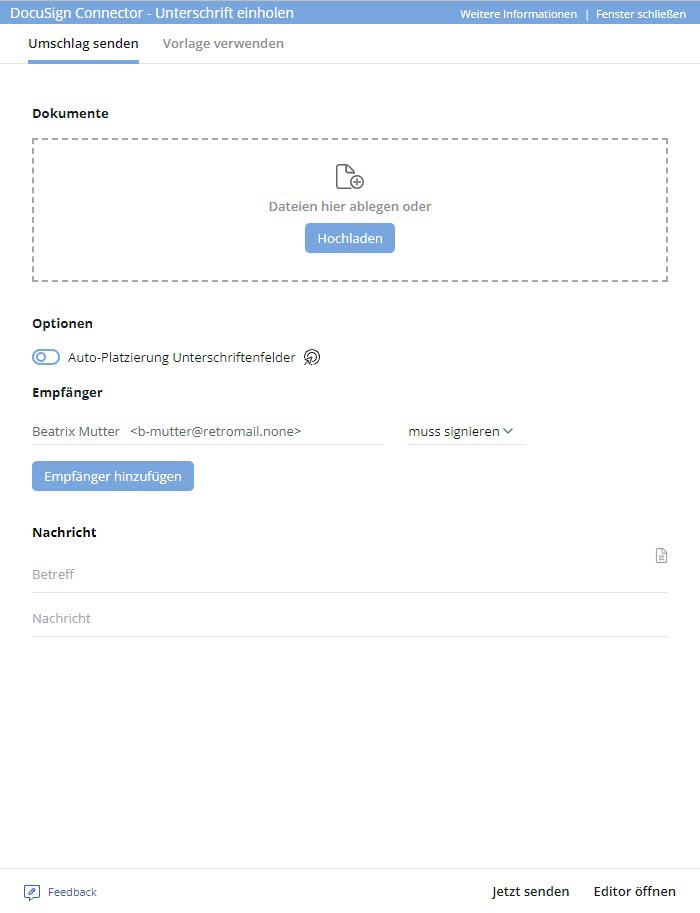
You can call up the DocuSign service in any address in the Marketplace menu of the action bar via “DocuSign Connector >> Obtain signature” .
Upload the documents in the “Documents” section for which you would like to obtain a signature.
The address from which you accessed the service is entered as the recipient . You can add further recipients. You can set for each recipient whether they should sign the documents or only receive a copy.
In the “Message” area, you define the subject and content of the email. The documents to be signed are attached to the email. You can use the “Use message template” document icon to select preconfigured message templates from the administration.
Under “Options” , activate or deactivate the “Auto-placement of signature fields”setting. DocuSign can search documents for text and automatically place signature fields near a specific character string (anchor text). The character string is displayed on the recipient’s right. At the moment, the anchor text cannot yet be freely selected, but is “/sig1/”, “/sig2/” etc.. This is incremented for each recipient so that you can simply insert the character string in your documents.
If the setting is active, you can also enter the horizontal and vertical offset in centimeters
You can send the documents directly via “Send now” .
Via “Open editor” you can make further settings for sending in the DocuSign account itself and send from there.
4.) Activities
Activities of the “eSignature” kind of action are written for the individual actions performed for the addresses written to.
Actions such as “Envelope sent”, “Envelope completed”, “Envelope rejected”, “Recipient has signed”, etc. are logged.
5.) Template management
Preconfigured templates from DocuSign can also be used and sent via onOffice enterprise. These are visible under “Administration >> Template management”. To be able to use the templates, they must first be configured and activated there.
You can find the template management via the Marketplace menu under “DocuSign >> Template management”.
The most important information about your templates is displayed as a list view.
If you hover over a line with the mouse, you can open the template directly in DocuSign via “Open in DocuSign” and edit it there.
Notice: Currently only generic text fields are supported by DocuSign, the other data types such as “Number”, “Dropdown” etc. are not transferred to onOffice.
You can find help on creating and editing templates in DocuSign in the DocuSign Help.
Click on “Edit” to open the detailed view of the template in onOffice enterprise. Here you can make the field assignments for DocuSign fields and onOffice fields. The data from the onOffice fields is then transferred directly to the signature document.

All DocuSign fields of the template are displayed at the top left of the DocuSign box . The list can be further filtered by “Document”, “Recipient” and “Field”.
The onOffice fields are displayed at the top right of the onOffice box . Only address fields can currently be assigned to “Envelope link”. Later, property fields will also be possible.
Under “Obtain data from” ,select whether data is to be used directly from the envelope link (address) or whether an address relationship (person responsible for the address / user data) is to be tracked.
Under “Field” you can search for specific fields and the list will be filtered accordingly.
You can set a field assignment by selecting the radio buttons next to the DocuSign and onOffice field. After clicking on “Assign” , the assignment is visible under “Field assignments”.
In the “Template settings” , you can set the template to active or inactive under “Status” . A template created in DocuSign must first be activated here.
If “Do not store signed documents in signatories’ address data records” is activated, the documents are not stored in the relevant address data records.
Click “Back” to return to the template list, but the field assignments you have set will be retained. Click “Finish” to save the “Template settings” and return to the template list.
6.) Sending templates
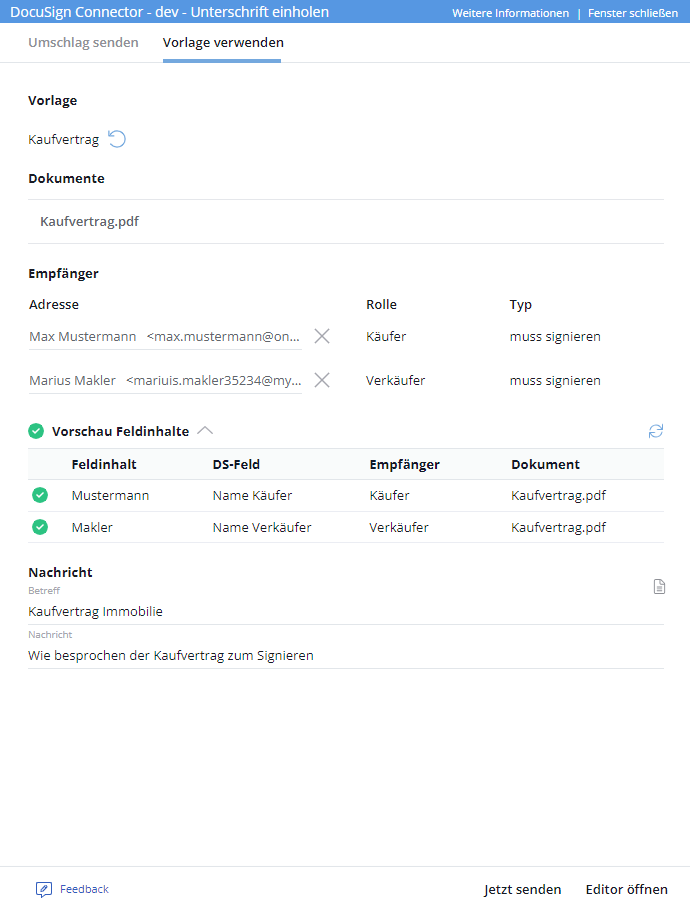
To send a template, open the “Obtain signature” function in an address data record and call up the “Send template” tab in the pop-up window. The list of your active templates opens.
Select the desired template using the radio button on the left and press “Select”. The view for sending the template opens. The “Search” field can be used to search for specific templates.
Enter any missing recipients. The address from which you opened the DocuSign service is linked as the first recipient.
Under “Preview field contents” you can see whether a value from onOffice has been assigned to all DocuSign fields in the document. If not, please check whether a field assignment exists for this field and whether the recipient has a value for the field in their address data record.
For Message , the subject and message are taken from the DocuSign template. You can also use the document icon “Use message template” to the right of Message to select preconfigured message templates from the administration.
Once everything has been filled in correctly and linked, you can send the document directly to the recipients by clicking on “Send now”.
Click the “Back” icon at the top of “Template” to return to the list of templates. Click on “Open editor” to open the DocuSign editor where you can make adjustments before sending.
Please note that it is not necessary to fill in “Name” and “Email” in the DocuSign template, as these recipients are selected in onOffice. Only the roller is required. Otherwise the document will also be sent to the recipients entered there.
7.) Cover overview
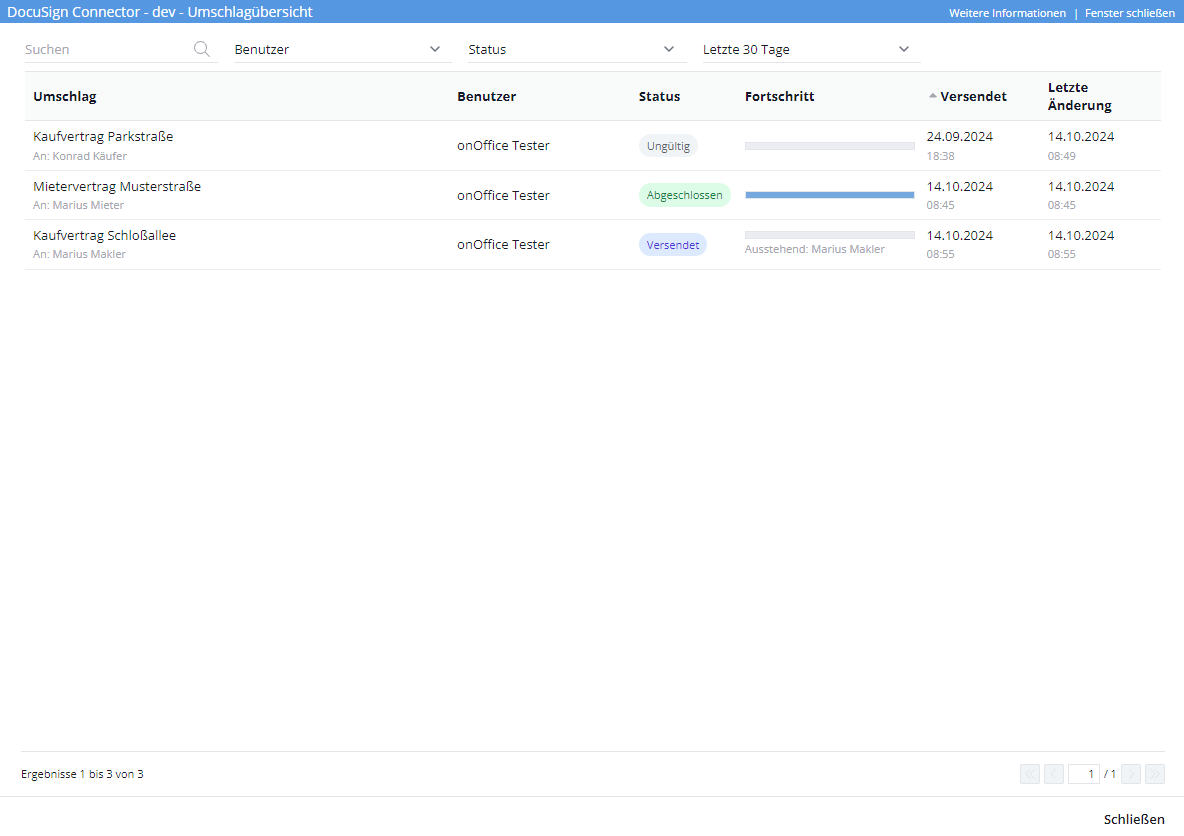
You can track the status of your sent envelopes in the envelope overview, accessible via the Marketplace menu at the top.
In the filter bar at the top, you can search for a specific envelope or filter by user, status or time period.
The following status values are available in the DocuSign service: “Rejected”, “Completed”, “Created”, “Deleted”, “Invalid”, “Signed”, “Processing”, “Sent” and “Delivered”.
8.) Feedback
9.) Help with DocuSign
- Assign debits via reference ID
- Provider overview
- Space Renovator- Virtual Homestaging
- onOffice Services - DocuSign Connector - digital signatures
- onOffice Services - WKO Marketplace - Portal for joint business in Austria (MLS)
- PropNow - Digital quotation process
- Residenture - Online auction platform
- onOffice Services - Gender API
- Sprengnetter property Valuation
- Sprengnetter - Real estate valuation in Europe
- timum - sightseeing organizer
- Total Render - Floor Plans Italy
- ViertelCheck - Information on the micro and macro situation
- finioo - Application folder
- Justhome - Real estate financing
- Backbone - Property images
- BOTTIMMO - Marketing software and digital acquisition
- bots4you - Universal messaging platform
- ESYSYNC - Display systems
- FPRE - property analysis and valuation
- Geolyzer - infrastructure data
- immo-billie - Digital bidding process
- Immogrundriss - Floor plans & visualizations
- immowriter - AI for property texts and images
- AreaButler - Interactive maps and AI assistant
- Kerberos compliance management systems
- KIM real estate valuation
- Lead Import
- Tenant check - credit check of prospective tenants
- MYVIVENDA - Print on Demand
- Ogulo - 360° tour
- onOffice Services - PhotoDesigner
- onOffice Services - AI-Writer - AI for property texts
- Service not usable?
- Use service
- Unlock/lock provider
- Manage account
- Create account

 Introduction
 Dashboard
 Addresses
 Properties
 Email
Email Calender
 Tasks
Tasks Statistic-Kit
 Statistic-Tab
 Request manager
 Showcase TV
 Acquisition Cockpit
 Marketing box
 Success cockpit
 Process manager
 Groups
 onOffice sync
 Presentation PDFs
 Billing
 Smart site 2.0
 Project management
 Time recording
 Property value analyses
 Multi-Language-Module
 Automatic brochure distribution
 Multi-Object modul
 Intranet
 Audit-proof mail archiving
 Favorite links
 Boilerplates
 Property import
 onOffice-MLS
 Portals
 Address from clipboard
 Mass update
 Formulas and calculating
 Quick Access
 Templates
 Settings
 Customer communication
 External Tools
 Step by step

