You are here: Home / Tutorials / Step by step / General instructions / Create work lists

Step by step
Create work lists
If you want to combine several address or property data records into one list, onOffice offers the option of creating worklists. Unless otherwise specified, worklists are only visible to the person who created them.
This is done below using the example of an address worklist. Please open the address list view first.
Then select the desired data records that you want to combine into a list. You can also select data records from several pages.
If there are many data records spread over several pages, you can first create a filter that covers all data records. It is not necessary to select the data records individually, you can call up the filter or the result of the filter in the “Create work lists” dialog.
Now select the “Create/Extend/Move” item in the action bar via the “Work actions” menu item.
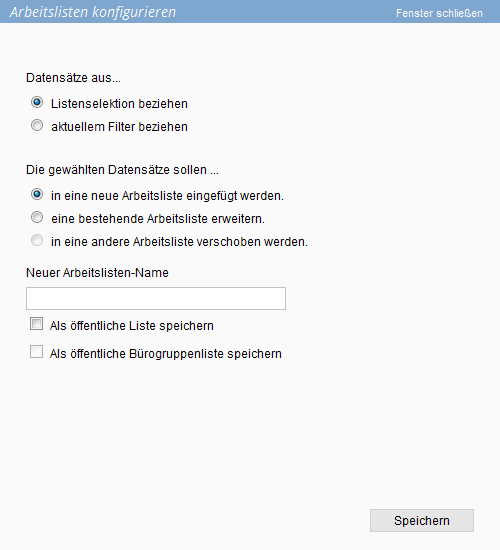
The “Configure work lists” dialog opens.
The dialog is preset for creating a new worklist – this is also what is to be carried out in the example.
Marked data records
Please do not change the setting for “Obtain data records from list selection”.
Enter a name for the worklist here, e.g. “Team”. If the worklist should not only be visible and usable for you, you must assign the appropriate authorization.
- Without a check mark, it is a private (only visible to the user himself) worklist.
- A public work list is visible to everyone. Public lists may only be created if the corresponding right has been assigned.
- Only the members of your group can see an office group list. If you are a member of an office group, you can always create office group lists.
Data records from filter
With the enterprise edition, you can also convert the result of a filter directly into a worklist. Please start creating the worklist only after you have the result of the filter .
In the “Configure worklists” dialog, please select “Obtain data records from current filter”. The next step is to assign a name and authorization for the worklist, as described under “Selected data records”.
The selected or filtered data records can also be added to an existing worklist. Click on “Extend an existing worklist” to display a selection box of the existing worklists from which you can select the desired one.
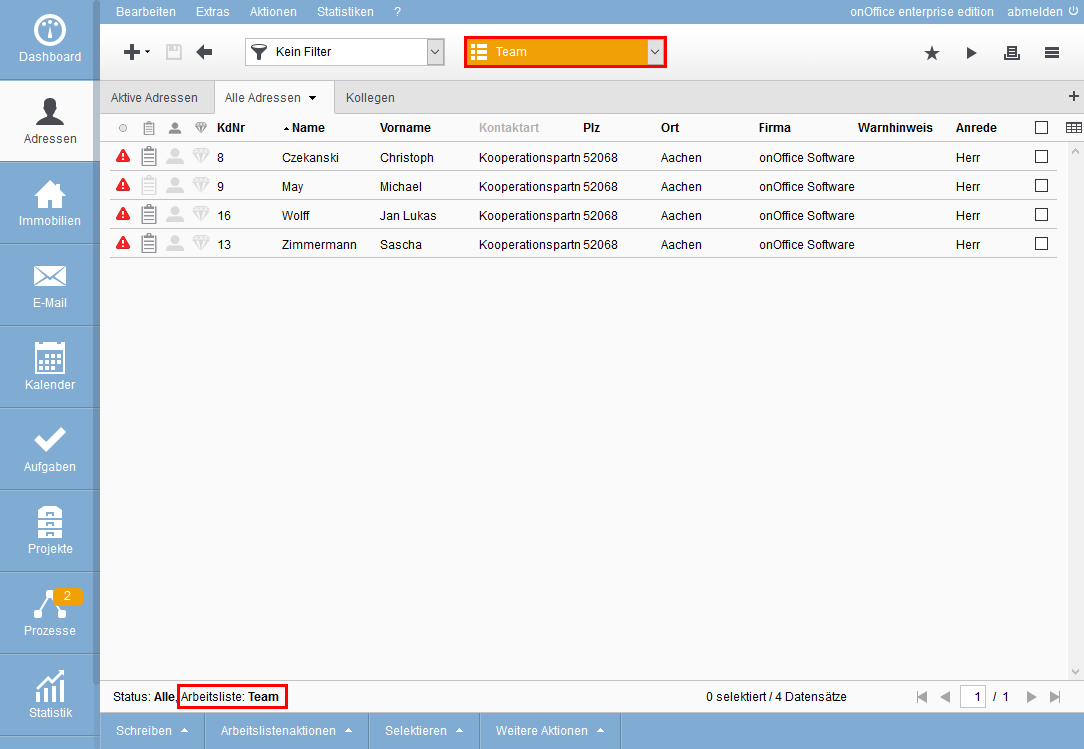
The next step takes you to the list view of the worklist. The worklist is selected and only the data records from the worklist are displayed. This applies to the table view, tile view and presentation view (the latter only for properties).
In the toolbar, the work list field is highlighted in color and the name of the list is displayed. The name is also displayed again in the navigation bar.
Please note that not all data records are now available for editing, but only those that are contained in the list. To deselect the work list again, you must select the value “No list” in the “Work list” field (list view at the top next to Filter).
- Administrative instructions
- General instructions
- Status and extended status
- Create email signature
- Create Word templates
- Marketplace - Create user account
- Address data record maintenance
- Dictionary
- Absence note
- property search
- Send serial email
- Store files on server
- Create work lists
- Edit work lists
- Assign contact person
- onOffice-MLS
- Watermark
- Set values configure at revocation

 Introduction
 Dashboard
 Addresses
 Properties
 Email
Email Calender
 Tasks
Tasks Statistic-Kit
 Statistic-Tab
 Request manager
 Showcase TV
 Acquisition Cockpit
 Marketing box
 Success cockpit
 Process manager
 Groups
 onOffice sync
 Presentation PDFs
 Billing
 Smart site 2.0
 Project management
 Time recording
 Property value analyses
 Multi-Language-Module
 Automatic brochure distribution
 Multi-Object modul
 Intranet
 Audit-proof mail archiving
 Favorite links
 Boilerplates
 Property import
 onOffice-MLS
 Portals
 Address from clipboard
 Mass update
 Formulas and calculating
 Quick Access
 Templates
 Settings
 Customer communication
 External Tools
 Step by step


