 Entry
Entry Dashboard
 Contacts
 Properties
 Email
Email Calendar
 Tasks
Tasks Acquisition Cockpit
 Audit-proof mail archiving
 Automatic brochure dispatch
 Billing
 Groups
 Intranet
 Marketing Box
 Multi Property module
 Multilingual Module
 onOffice sync
 Presentation PDFs
 Process manager
 Project Management
 Property value analyses
 Enquiry Manager
 Showcase TV
 Smart site 2.0
 Statistic Tab
 Statistics toolbox
 Success Cockpit
 Time Tracking
 Address from clipboard
 Text block
 Customer communication
 External Tools
 Favorite links
 Calculating with formulas
 Mass update
 onOffice-MLS
 Portals
 Property import
 Quick Access
 Settings
 Templates
 Step by step
You are here: Home / Extras / Customer communication / E-mail

Customer communication

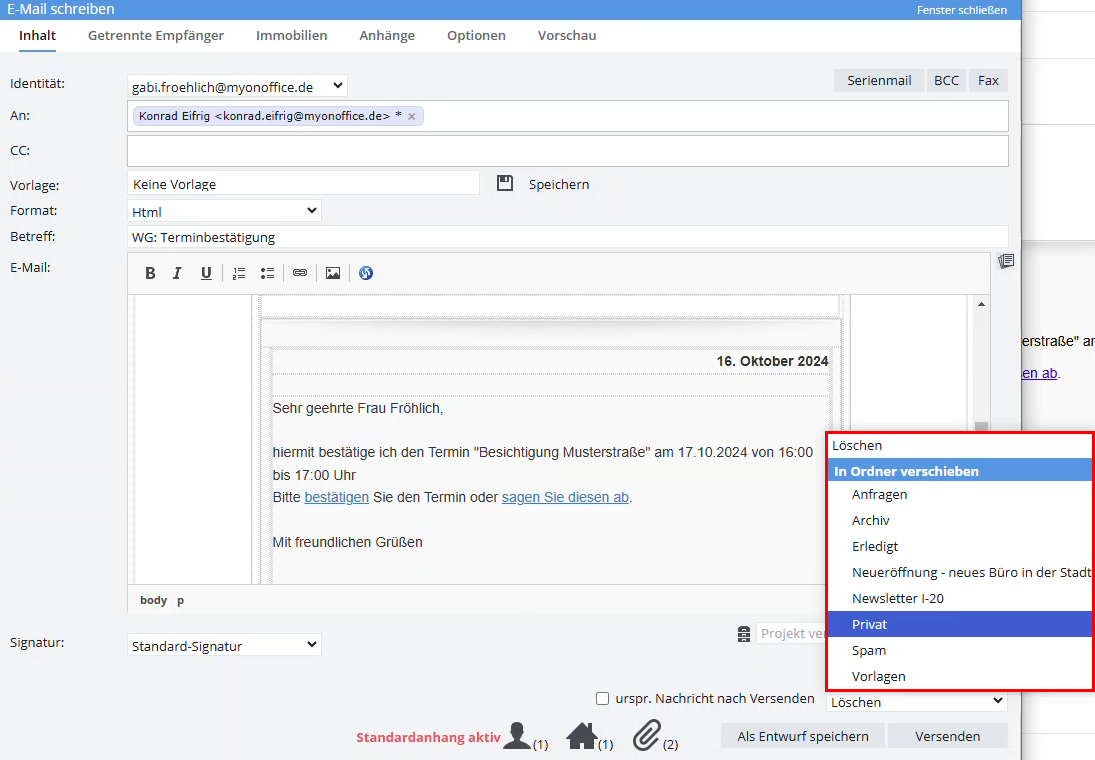
In the tab Content you define which type of email you write (sending area), to whom you write (recipient area) and which template (template area) / text (text area) should be included.
What types of email are there in enterprise? In addition to the simple email, there are serial emails, fax and the combination of email types and fax.

Inhaltsverzeichnis
The tab “Content” offers the following functions:
- Addressing area
- Identity: here you can select the sender email address, if you have more than one mailbox. The address that you have currently opened as a mailbox is preselected.
- Fax: this is used to send faxes . The Fax line for entering fax numbers is displayed.
- Serial email: You can activate the serial email function with this button.
- BCC: activates the address field “BCC” in the recipientt area.
- Recipient range:
- On: Type the beginning of the name or email address into the field, onOffice enterprise edition then searches for matching entries from the Contact records / last entered email addresses and suggests them.
Several recipients can be entered in the field, they will then receive the same email. Each of the recipients can see to whom the email was sent. An activity entry is also created for each recipient. Attention: Here, the use of address macros is not possible (because there is no clear reference to the individual addresses).
For each recipient in the ‘To’ field, resubmissions and updates of contact information (last contact, etc.) are set. - If entered in the “To” field, the selection is prevented on the “Separate recipients” tab.
For (active) recipients on the “Separate recipients” tab, the selection in the “To” field is prevented. - CC: You can send a copy of the email to other recipients. To add a BCC recipient, you have to add the corresponding field via the button “BCC” in the addressing area
- On: Type the beginning of the name or email address into the field, onOffice enterprise edition then searches for matching entries from the Contact records / last entered email addresses and suggests them.
- Templates:
- Templates: Select a template from your template pool or choose a saved email draft. A default template can also be selected.
- Save / Delete: These icons only appear if you have the user rights to write or delete templates. With the help of the Save button, a written email can be used as a template or changes can be saved to an existing template. If you have the necessary user rights , you can mark the new email template as Private.
Use the “Trash” icon to delete templates that you do not need. - Standard template; As soon as you have selected a template, you can set it as the standard template or always detach a set one. The default template is loaded directly when opening the email dialog.
- Content area:
- Format: If you want to format the text or include images in the email, the format must be changed from text to HTML. The default can be set in the user settings in the tab Email .
There you can also set other default settings such as font, prefixes for reply etc. - Subject: Only text can be entered here, formatting etc. is not possible. Macros are possible, however.
- Email: Here you can create the text or adjust the selected template. Frequently used formulations can be inserted via text modules
 .
.
You can also use the CKEditor to include images, links and text formatting in the text. This is only possible for email in HTML format. - Signature: Please select a signature. Signatures can be created in the user settings. There is a tutorialfor this.
- Link project: Here you can link a project to the email if you have activated the project management module. Project numbers and titles of projects can be found via the search.
- Track shipping: When sending a serial mail or normal mails, you can also record who has opened the email. For this purpose, there is the additional module “Marketing Box“. There you will also find details about the function and configuration.
- AI tools: Several functions are available via the “AI tools”icon to improve your emails using artificial intelligence. Select the text in the content area that you want to improve and select an option from the “AI tool” . The generated answer is then displayed above the selected text. The following functions are available: “As an instruction”, “Convert form of address”, “Formulate answer”, “Correct errors”, “Formulate key points”, “Rephrase” and “Summarize”. “As an instruction” is a general request that you can formulate yourself.
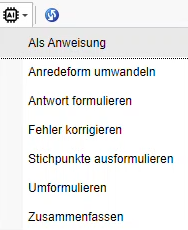
To be able to use the “AI tools”, you need an account with an API key at OpenAI, which you can connect to onOffice enterprise in the basic settings . You can find your API key at https://platform.openai.com/account/api-keys.
- Format: If you want to format the text or include images in the email, the format must be changed from text to HTML. The default can be set in the user settings in the tab Email .
You can mark the email as private using the lock icon to the left of “Save as draft”. This means that the email activities generated by this email are only visible to users who have access to the sender’s or recipient’s mailbox. Please note that the user right “Mark emails as private” must be set for this. You can also use the“VIP” email setting to set this for the entire mailbox.
Click on the “Save as draft” button to save the text in the “Drafts” folder. These email drafts can only be accessed in the email composer and not via the templates / file management.
When you reply to or forward an email, you have the additional option of deleting the original message after sending or moving it to one of your own email folders. To do this, check the box “Original message after sending” and select the folder to which the original email should be moved.
When you send an email to multiple recipients, you can send it as a copy (CC) or as a blind copy (BCC). However, an identical email is sent to all of them. A personalization – especially letter salutation – is not possible.
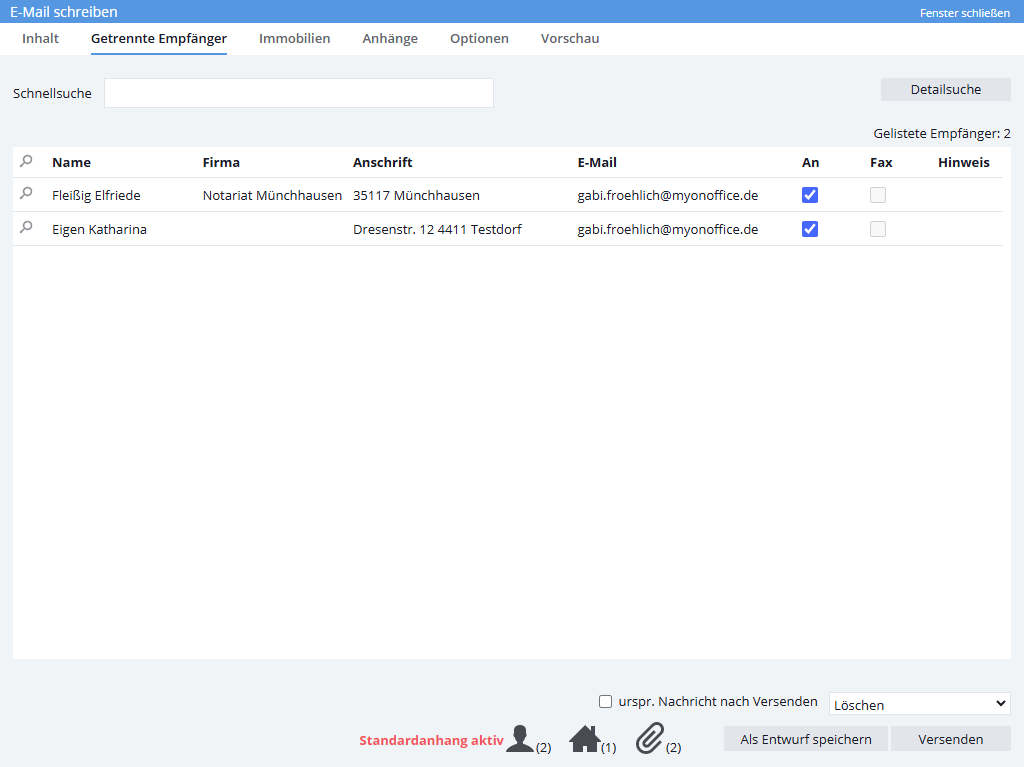
With “separate recipients” you can also send an email individually to several recipients. Since each email is created individually, no one can see that the email was sent to multiple recipients.
If you do not know the exact name, you can search for addresses via “Detailed search”. You can perform a detailed search, add entire lists of contacts with worklists / filters or add contacts of owners, interested parties, buyers / tenants to a linked property.
From the list of displayed contacts, you can select which ones should be included in the list of recipients by clicking on the checkbox.
The selected addresses appear in the list. Addresses without a valid email address are shown in red in the list and have no check mark in the “To” column. Only the addresses with a check mark will be written to during dispatch. If the address has a fax number, the Fax column is displayed with a check mark and the address is shown in green.
Addresses with a warning notice are marked with ![]() – the warning text is displayed in the mouseover.
– the warning text is displayed in the mouseover.
The number, next to the address icon at the bottom of the email dialog, indicates the number of linked addresses with valid email addresses.
You want to offer a property to the interested party and attach the appropriate brochure? The email dispatch should be documented in the agent’s log? All this is possible when you link a property.
For example, type the beginning of the ext. ImmoNr. into the field “Quick search”, onOffice enterprise edition then searches for suitable entries and suggests them.
You can search for properties via “Detailed search”. You can perform a detailed search or add entire lists of properties with worklists / filters .
From the list of displayed properties, you can determine which ones should be transferred to the list of recipients by checking the box.
Here you can add email attachments, e.g. your own files, files from the linked properties or addresses, and brochures. Standard attachments are also created here.
Brochures as attachments are generated for each linked property.
The “Online Storage” contains all files that you have saved under .
A default attachment is attached to every email and cannot be selected under “My own”. The file always appears with the activated attachments and in the list of selected attachments. If you do not want the standard attachment to be sent with an email, you can delete the file in the list of “Activated attachments”.

On the far left you select the area from which the attachment should come. In the middle you see the list of “Available attachments”. The activated attachments are displayed on the right and the default attachments are displayed on the bottom right.
Here you can make further settings, these are valid for the current dispatch.
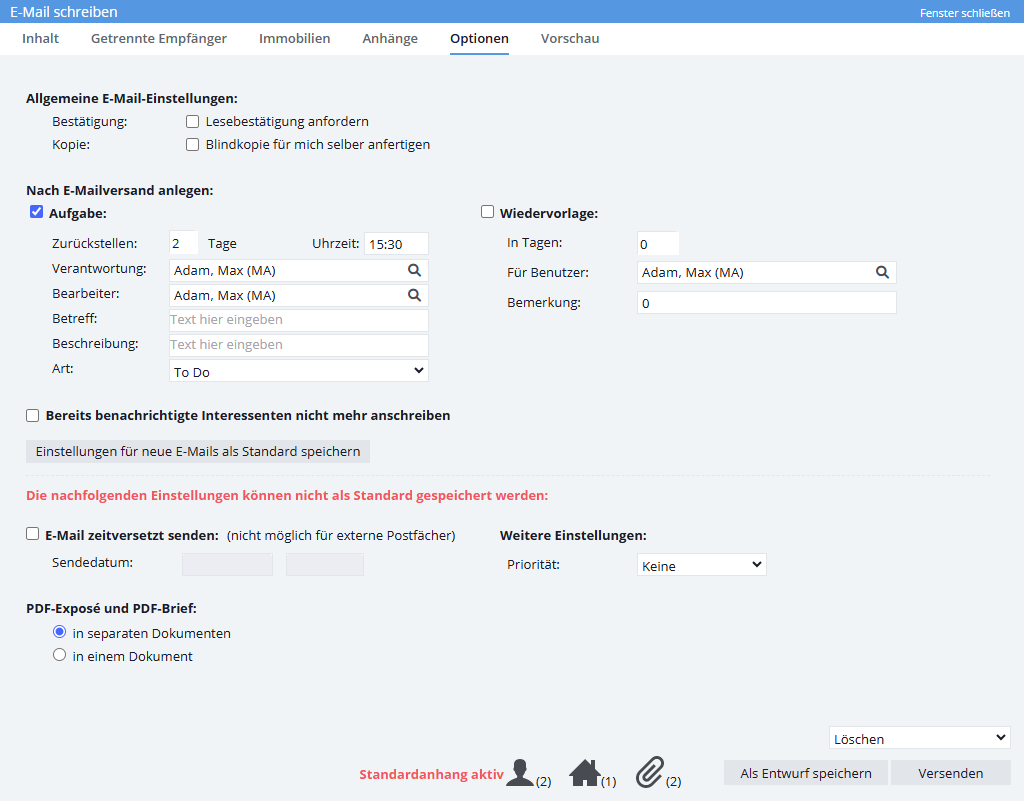
You can save them permanently by clicking the button “Save settings for new emails as default”.
You cannot save the second “Additional settings” category.
General email settings
- Confirmation
By ticking “Request read confirmation”, the recipient is asked on receipt of the email whether he/she would like to send a confirmation of receipt. If the recipient agrees, you will receive the read confirmation by email. - Copy
If the option “Make a blind copy for myself” is activated, a blind copy will be sent to your own email address when the email is sent.
Create after Email dispatch
Tasks
- Reset: Specify how long after the email is sent the created task should be put on hold. If nothing or a 0 is entered for “Days”, but a time is entered, the task is reset for the current day.
- Responsibility Specify here who is responsible for the task.
- Edit Here the agent is defined depending on the responsible group.
- Subject: The task subject can be entered here. If no subject is entered, the subject of the sent Email is used as subject.
- Description: The description text of the task is defined here. As for the subject, if it is left blank, the text of the email will be used.
- Type Nature of Task.
Follow-up
- Set a resubmission in X days for any user
Do you want to follow up with this interested party after a few days? Then set a resubmission with a suitable comment. - Do not write to interested parties who have already been notified
If you have a large list of linked interested parties, it makes sense to activate this option. In this way you prevent a prospective buyer from receiving the brochure on a certain property a second time.
Attention: If several properties are linked and there is at least one new property among them, a new letter will also be sent to an interested party already contacted.
You can find a detailed video on email resubmissions here.
Save setting permanently as default
- You can save the above settings as the default for all future emails. These default settings also apply to emails that are answered.
The settings now described are not saved with the default settings.
Delayed sending of the email
- Can be set to send the email only on a selected date and time. You can enter the date and time for the shipment here. The delayed sending of emails is only possible if onOffice is also the email provider. Your administrator can tell you more details. Notice: Serial emails with more than 100 recipients cannot be time-shifted.
PDF-brochure and PDF-letter
- If a PDF letter and a PDF brochure are sent with the email, you can choose here whether the two documents are sent separately or as one document.
Further settings
- Agent’s log For serial emails, you can decide whether you want to create a agent’s log entry or not. If in the basic settings () the option “Update brochure generation in the agent’s log” has been activated, entries are always created and the option is greyed out.
- Priority: The priority can be set here.
You can preview your email at any time. The macros used are already replaced with the data from the linked address and property data records. Appendices are also created in the process.
Note that the preview cannot display the data of all recipients. Only the first address or property data record is displayed in the preview.
Please always check the preview and the correct signature before sending.
Dispatch
After the text and all attachments etc. are available, the email can be sent by clicking the “Send” button. For easier control, the number of linked recipients, properties as well as attachments are displayed at the very bottom of the popup next to the icons. Next to it are the buttons for “Create preview”, “Send as email” and “Create PDF”.
Additionally you can save the email text as a draft. Drafts are reloaded via the template selection.
When replying or forwarding a email, the original email can also be moved directly (checkbox and selection at “original message after sending”)