You are here: Home / Modules / Addresses / Address detail view / Property search – overview / Property search - Details

Addresses

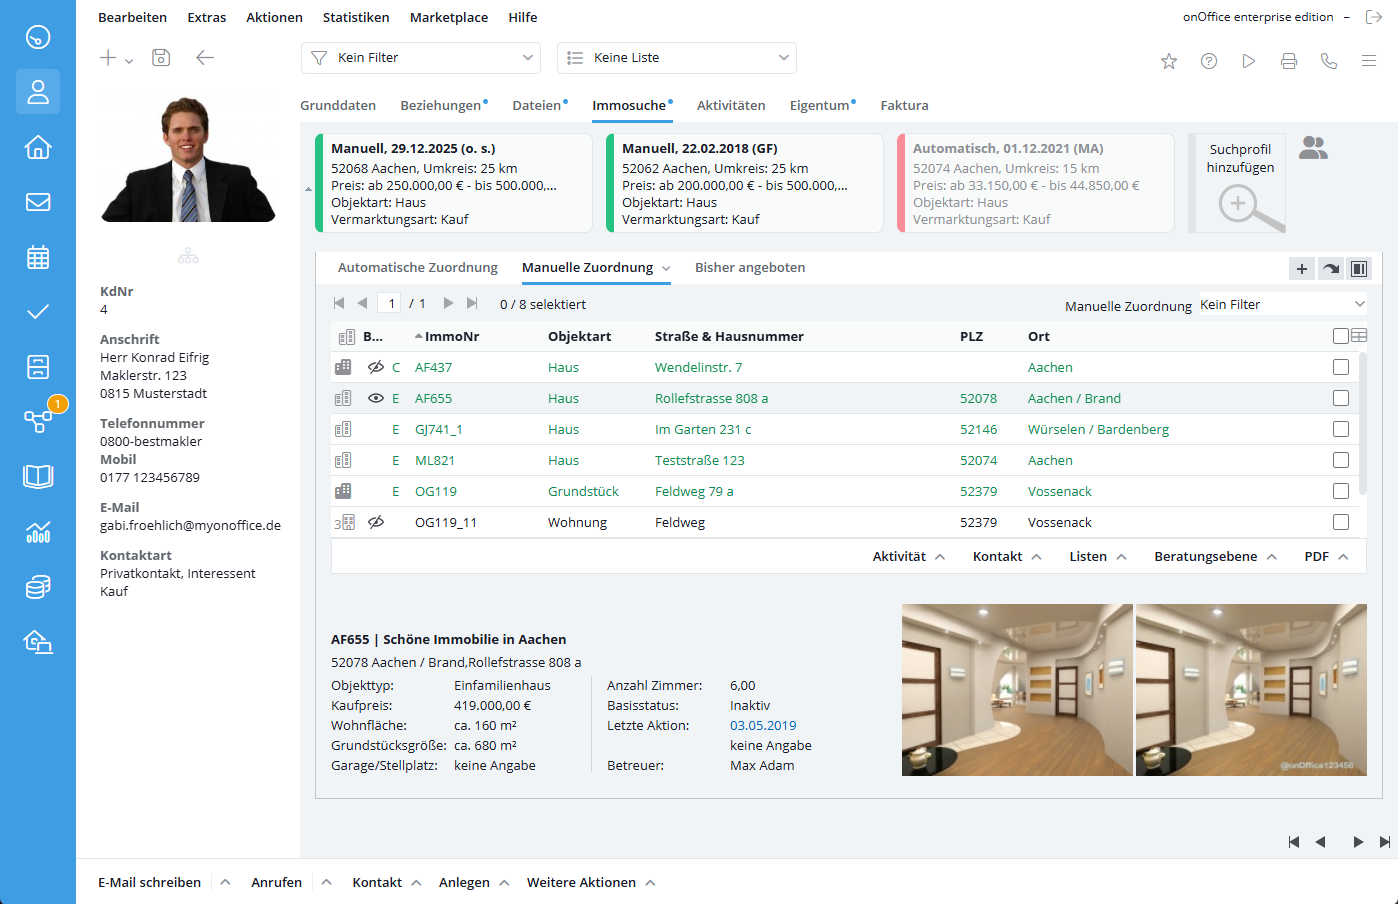
Property search – Details

property search

Notice:

Properties for which the current contact record is entered as the owner are not displayed.

Only properties that have the marketing status “open” are displayed in case of automatic assignment.

In addition to the overview of the property search and the tutorial , the search profiles, the function of the property search, the presentation of the results and the further steps are dealt with in detail here.

With the “property search” you can examine properties and prospective customers in your database for “matching pairs”. The basis for property matching are the search profiles, which are also managed in the tab “Property search”. If there are search profiles in a contact record, the “property search” tab will have a blue highlight at the top.

You can find a training video here.


address management property search

You can view the property details below or on the right. If you have a long list of suitable properties, it is a good idea to display the details on the right-hand side, and you can also reduce the height of the search profile bar.

With the result of the property search, further actions are then possible, for example, you can directly send an offer to the interested party for a property.

Search profiles

Search profiles Representation

The search profiles – as a set of search criteria – are displayed grouped in the search profile bar, first the manually created ones, then the automatically created ones. The most recent search profile – i.e. the last one edited – is displayed first.
A tile with the most important properties is displayed for each search profile. More search criteria and information are displayed via the magnifying glass preview . The icon with the magnifying glass appears when you move the mouse over the corresponding tile. The other icons for editing, deleting and “pinning” are explained below.
Rights can also be assigned for search profiles so that different users can see different search profiles in an address data record under certain circumstances. For example, if you do not have write permission, the edit icon is grayed out.


search profile bar large

Search profiles can have the status active or inactive (gray font). In addition to the manual inactivation, the status of the search profile can be set via the validity or by the interested party himself via emails with macros _AdrSuchkriterienDeaktivieren() or _AdrSuchkriterienUpToDate() or the Contact data completion.

If more space is needed, the bar can be folded in. Only the data of the most recent
(= last edited) or the pinned search profile and the number of search profiles are then displayed.


Search criteria bar in the address

Create search profiles manually

Search profiles can be created by clicking the “Add search profile” button on the right side of the search profile bar, or by clicking the action bar Create >> Search Criterion. The latter works from anywhere in the contact record.
In both cases, a lightbox opens for entering the criteria (corresponds to the previous popup). The criteria correspond to the properties of the property and are listed as field name and field value in the tab “Search criteria”. The “KO Criterion” column affects the search result and is discussed below.

You can adjust the standard criteria in the administration . There you can also create search profile templates that, for example, specify a different set of fields for different types of property. These search profile templates can be used and also exchanged under ‘Template’. If a template is swapped, fields that have already been labeled but are not actually included in the new search profile template will remain and will be saved as long as they are not cleared.


Creation of a new search profile

If the displayed criteria do not cover all of the interested party’s wishes, you can individually add further criteria via “Select new field” and “Create new field”. All active property properties are displayed as possible criteria.
In addition to adding search criteria, you can of course also remove them using the trash can icon.

Here is another example of individual fields in combination with KO criteria:
Your prospective buyer would definitely like an apartment in which pets are allowed and the bathroom has a bathtub. To do this, create the new criterion “Bath” and then specify the type further. In addition, create a new “criterion” pets and select the option “Yes” for it. As these two criteria are a “must” for your prospective buyer, place a tick in the KO criterion column next to the “Bathroom” and “Pets” fields and save the new information.
In the above example, what about properties for which no “bathroom or pet information” is stored? If the property otherwise matches, it will be found by default. If you want to have the KO criterion so strict that only the properties with deposited and suitable “bath and pet information” are found, then you can set this in the basic settings at “Search for interested parties/properties.

    • Some points concerning search criteria should be mentioned briefly:
  • Regional Addendum: This is an alternative geographical assignment to the radius search. The field and the regions must be activated and configured accordingly.
  • Required fields: Mandatory entries in the search profile are also possible and are highlighted in red. They can be configured in the administration for the search criteria.
  • From – To information: For numerical values such as floor space, number of rooms and purchase price, “from – to” information can be entered. In the case of commercial space, for example, the specification “divisible from” is taken into account in the properties.

In addition to the actual search criteria, further data is recorded in the search profiles. This includes “administrative information” such as the creator of the profile, creation date, modification date, maintainer, status (active/inactive) and validity. Search profiles also have features such as automatically created or modified via contact completion.

In the tab Remarks public remarks (If you have booked the feature “Tenant / Buyer Finder”, these remarks can additionally be published on your website. If you are interested, please contact your sales representative.) and internal comment can be stored for additional remarks around needs or wishes of the interested parties.

Change search profiles

You can edit the search profile using the pencil icon , which appears when you move the mouse over the search profile tile. The same lightbox will open as when you created it, but it also has “Delete” and “Duplicate” in the Actions bar >> More Actions. If you participate in the onOffice MLS, the entry “MLS Search” appears. This allows you to search for suitable properties in the onOffice MLS directly from the search profile.

Delete search profiles

You can delete the search profile by clicking on the trash can icon , which appears when you move the mouse over the search profile tile. Another option is in the search criteria lightbox itself, via the Actions bar >> More Actions >> Delete.

Create and edit search profiles, further options

Search profiles can be created or edited in other ways. This is noted in a characteristic or as an internal comment in the search profile itself.

Search profiles can be entered by the interested parties themselves via the contact completion . If you have configured contact completion accordingly, editing is also possible.

Search profiles can also be created automatically when assigning a property to an contact activity. If this is activated in the basic settings , a “Checkbox – Generate search criteria automatically” is displayed in these cases, e.g. in an email, task, in a agent’s log entry or also in the property search in the tab “Manual assignment” .

Search profiles Settings

Search profiles can of course be adapted to your wishes. The lightbox criteria can be specified in Administration >> Search Criteria. Templates with specific criteria for e.g. residential and commercial properties can also be created there.
The search profile tile can also be configured in the administration . The list settings for the search profile tile can be found under Tools >> Settings >> Administration >> Lists >> Configure from: Lists ; Module: Property search ; List: Profile tile.
The automatic search criteria and the validity of the search profiles is configured via Basic Settings >> General >> Automatic Search Criteria.

Find targeted properties in MLS-onOffice with search profiles

As a participant in the onOffice MLS , you can search the MLS for properties matching the current search profile. To do this, click on the link at “External search:” in the magnifying glass popover at the bottom.

Use property search

The property search with results list and detailed view takes up the rest of the tab. Based on the search profiles, thepproperty search looks for properties matching the current contact data record . The result of the search is then displayed as a table list – by default in the “Automatic assignment” list tab. As usual, the list tabs and the table itself can be customized to your own preferences, just like in the Property module. The list rider configuration has been extended to include the settings for the property search. In addition to the settings in the list tab configuration, the result can be narrowed down using a property filter at the top right of the navigation area. This filter applies to all list tabs.
A practical example for a property search and an offer email can be found in the tutorials, here the configuration and the connections are explained in more detail.


Property list in the property search

Search versus display

Although it sounds trivial, an important point is the difference between display and search. The result of the property search is stored in the background and the properties to be displayed are listed according to the configuration of the list rider. If a match of at least 75% is set instead of a match of at least 90%, the list view of the properties will be rebuilt, but NOT the search result will be redetermined. The date and time of the last update are displayed at the bottom left of the list action bar. To refresh the search results, there is a Refresh button at the top right of the list. However, there is one fundamental exception to this: When the Property search tab is opened, the results list is updated once – i.e. every time the tab is changed.
This automatic update can be changed in the user settings via the option “Automatically update search results when entering the property search”. Without this option, the results list for this contact record will remain in the background even if you change tabs or switch to another module.

Expert information

To be more precise, the update is not carried out when the property search tab is opened, but when a list tab with the “automatic assignment” mode is opened for the property status set there for the first time – and therefore for all list tabs that have the same combination of mode and status. If there are 2 list tabs for automatic assignment with different status specifications, the update for this status is only triggered when this list tab is opened.

How do you search?

The property search compares all properties with the active search profiles stored in the current contact data record. For each pair of search profile and existing property, a match value is calculated and displayed as a percentage in the list. A match for all specified criteria then results in 100%, for each deviation the value is reduced. A conclusion from the percentage value to the deviating property is not possible, via the detailed view deviations are partly displayed. If a property costs more than required, this results in a lower value for the match.
criteria, which are set as KO criteria, do not result in a deviation. However, the property must meet these requirements in full, otherwise it will not be included in the list of results. Thus, if all criteria are KO criteria, only fully matching properties would be offered. Why isn’t that the default? Example: A prospective buyer is looking for a property with a purchase price of up to €350,000, an otherwise suitable property is on offer for €360,000. If the purchase price is a KO criterion, this property will not be found as a hit. However, it may well be that the difference of €10,000 is not an obstacle in the negotiation and the property can be brokered by you. Similarly for the type of property, etc.

result list a profile

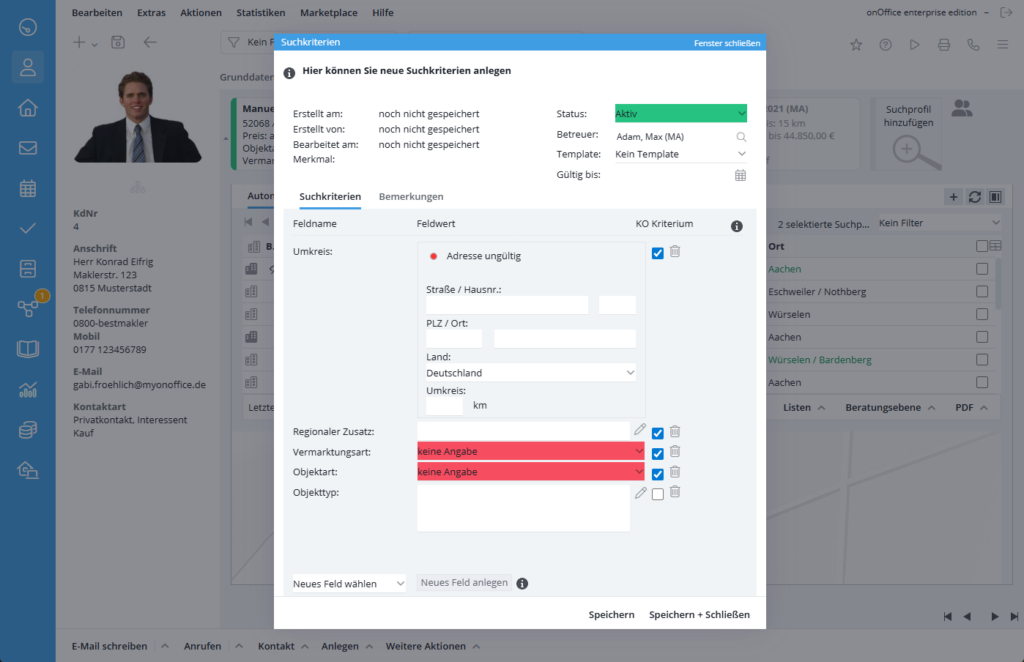
If several search profiles are stored in an contact, the property search is carried out for each profile. However, sometimes you want to limit the search to a specific search profile. For this purpose, a search profile can be pinned  . The pinned search criterion is highlighted and selected for all result list tabs. Clicking on the pin symbol again  or leaving the tab “Property search” releases the pin again.

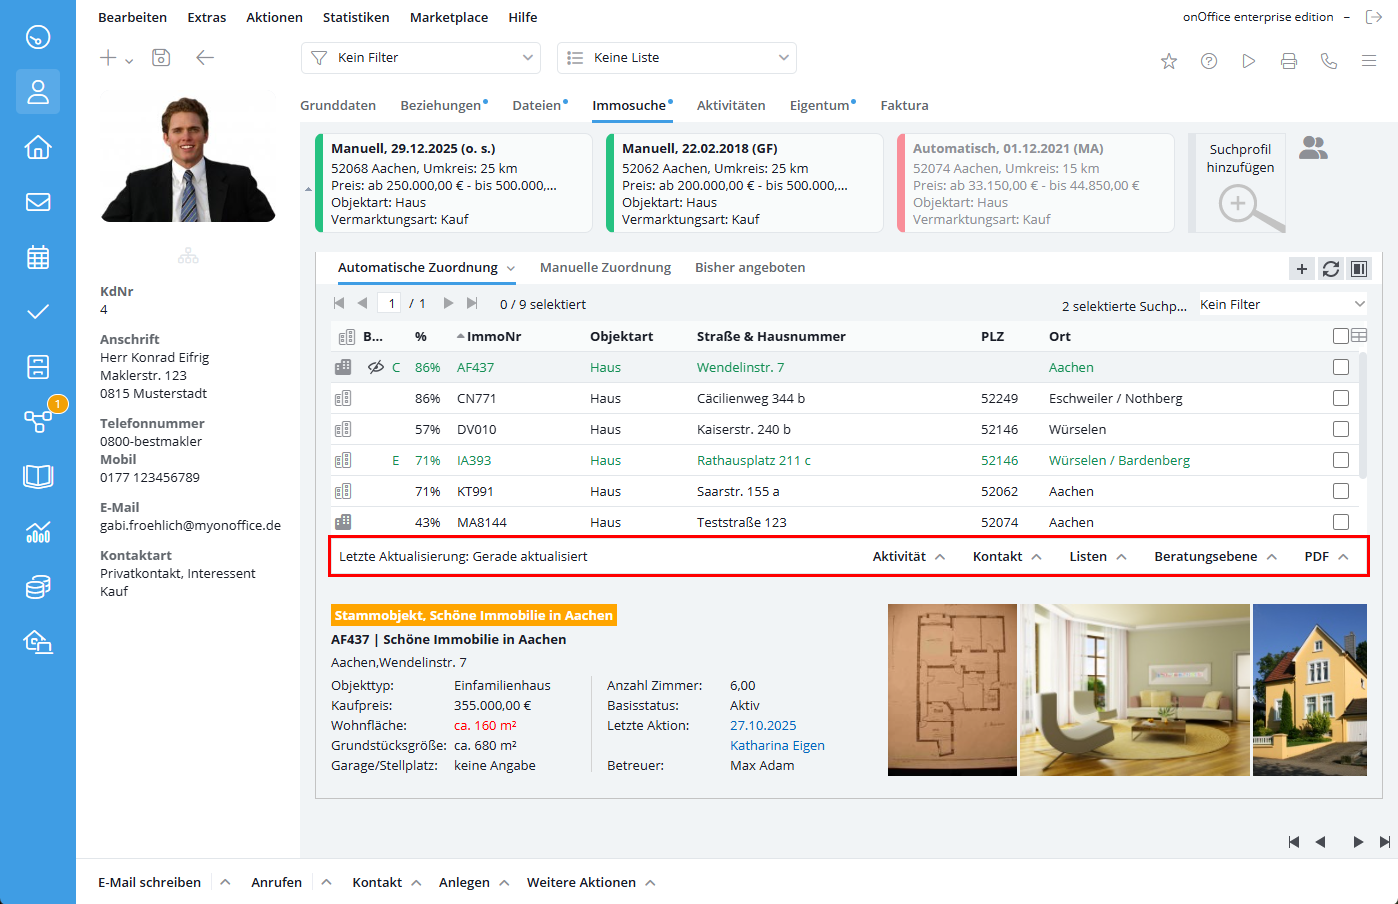
Result list, what is output?

No matter whether all search profiles or a single one are used as a basis, the result of the property search is a list of more or less suitable properties. This list can be further filtered and narrowed down to find the best properties.

First, look at the number of properties displayed above the list of results, as well as in the list on the column with the match. For very extensive lists, this can be narrowed down further, e.g. by only displaying your own properties or by selecting a property filter.
If the result does not contain the right property, you can, for example, lower the minimum percentage value for the match or display properties other than your own.

Note: only properties that have the marketing status “open” will be displayed in case of automatic assignment.


Besides the sorting and the property filter, all other options are set via the list rider configuration. If you frequently use certain other filtering in addition to the standard criteria, you can create and configure corresponding list tabs for this purpose.
For example, the list tab “Automatic assignment” could only display your own properties with the status “active marketing” and a match of more than 80%. Another list tab could set the match to 60% or show not only “own” or also search the “currently incoming” properties
(status = preparation).

Some list entries are highlighted in color and some activities are displayed as icons in the list. The following table provides an overview.

Green – interested party already contacted
Red – interested party has canceled
– viewing appointment arranged
– viewing appointment canceled

Results list, what next?

For hits with less than 100%, you can take a closer look at the property to verify your properties. Click on the entry in the list, then the most important details such as type of property / kind of property, prices, areas/rooms, owner and supervisor etc. are displayed at the bottom/right. If the deviating criteria affect the displayed properties, these are shown in red in the details.
By clicking on an image, you can start a gallery of the property images, or double-click to open the property record and check the other properties.

Click on the hover icon “Enter purchase price offer” next to each list entry to open a lightbox in which you can manually enter a purchase price offer for the current address for this property. Older, possibly existing purchase price offers are overwritten. When a purchase price offer is changed, an activity is written to the address and property concerned. The purchase price offers can be configured as a separate column “Purchase price offer (interested party)” for the list on the tabs Property search for addresses and Interested parties for properties. In the property feedback via the “Activate purchase price offer” option, you can also directly request purchase price offers from your customers, e.g. after you have carried out a viewing.


result list details

You can use the result or a selection from it to carry out further actions, such as sending an email with brochures, creating an activity (e.g. not reached on a call), creating work lists, etc. This is done via the list actions, which can be found under the results list.
The list actions offer the advantage over the action bar in the address data record that the selected properties are already transferred as a link, e.g. to the email composer.

Use the list actions from “Contact” to define a relationship between a contact record and a property record. The status of this relationship is noted as“advisory level” and explained below.

As a participant in the onOffice MLS , you can also always search for properties by clicking on the magnifying glass icon in the note at the bottom of the list.

Results list, other properties

As with all lists, only properties for which you have read permission are displayed. With the corresponding user right (“show other properties”), other suitable properties are also displayed in encrypted form. Click “Request Access” to send the property manager an email with your contact information.

Manual Assignments” and “Previously Offered” list tabs


Property search in one address

You know of a property for the interested party that was not displayed in the automatic property search and would like to list it here as a potential property? You can use the “Manual assignment” list tab to keep a corresponding list of assignments and include additional properties . Again, you can customize the view via property filters and list rider configuration as well as use list actions. All properties are displayed, regardless of their status.

An offered property is of course noted as a corresponding activity in the current contact record and in the real estate agent’s log of the property, a quick clear list can be found here in the tab “property search” with the list tab “previously offered”. All properties are listed here, regardless of their status, for which an activity exists that is linked to the respective contact.

The columns “offered on” and “offered for” can be added via the list configuration. The date or price of the last offer is displayed there.

Advisory level

The consulting level describes in which stage of the sales process the prospect is. The consulting levels are defined from A (lease/purchase agreement signed) to G (cancellation).

You can set this consultation level manually, e.g. via the list actions in the Property search tab or in Activities.

However, it is also set automatically, e.g. in the following cases:

  • Consultation Level E: When a letter/mail with contact or property reference is sent to the prospect or a file/brochure is sent from the property, if the consultation level was previously F or empty.
  • Consultation Level C: If the prospective customer gives positive feedback during the property feedback.
  • Consultation Level G: If the prospective customer gives negative feedback in the property feedback.

However, automatic actions can also depend on the consultation level: E.g. the automatic brochure dispatch for contact-property pairs checks whether an offer has already been created with one of the following consulting levels: A, B, C, D, E. If not, an offer will be sent automatically.

Below is a table showing the different levels of advice.

Advisory level Explanation Font color
A Rental/purchase agreement signed Green
B Written rental/purchase commitment Green
C in intensive conversation Green
D Interested, but still examining Green
E Receive documentation Green
F Documentation ordered Green
G Cancel Red